1. Introduction to TorchServe
1. TorchServe
1) TorchServe란
- TorchServe는 PyTorch 모델을 제공하기 위한 도구이다.

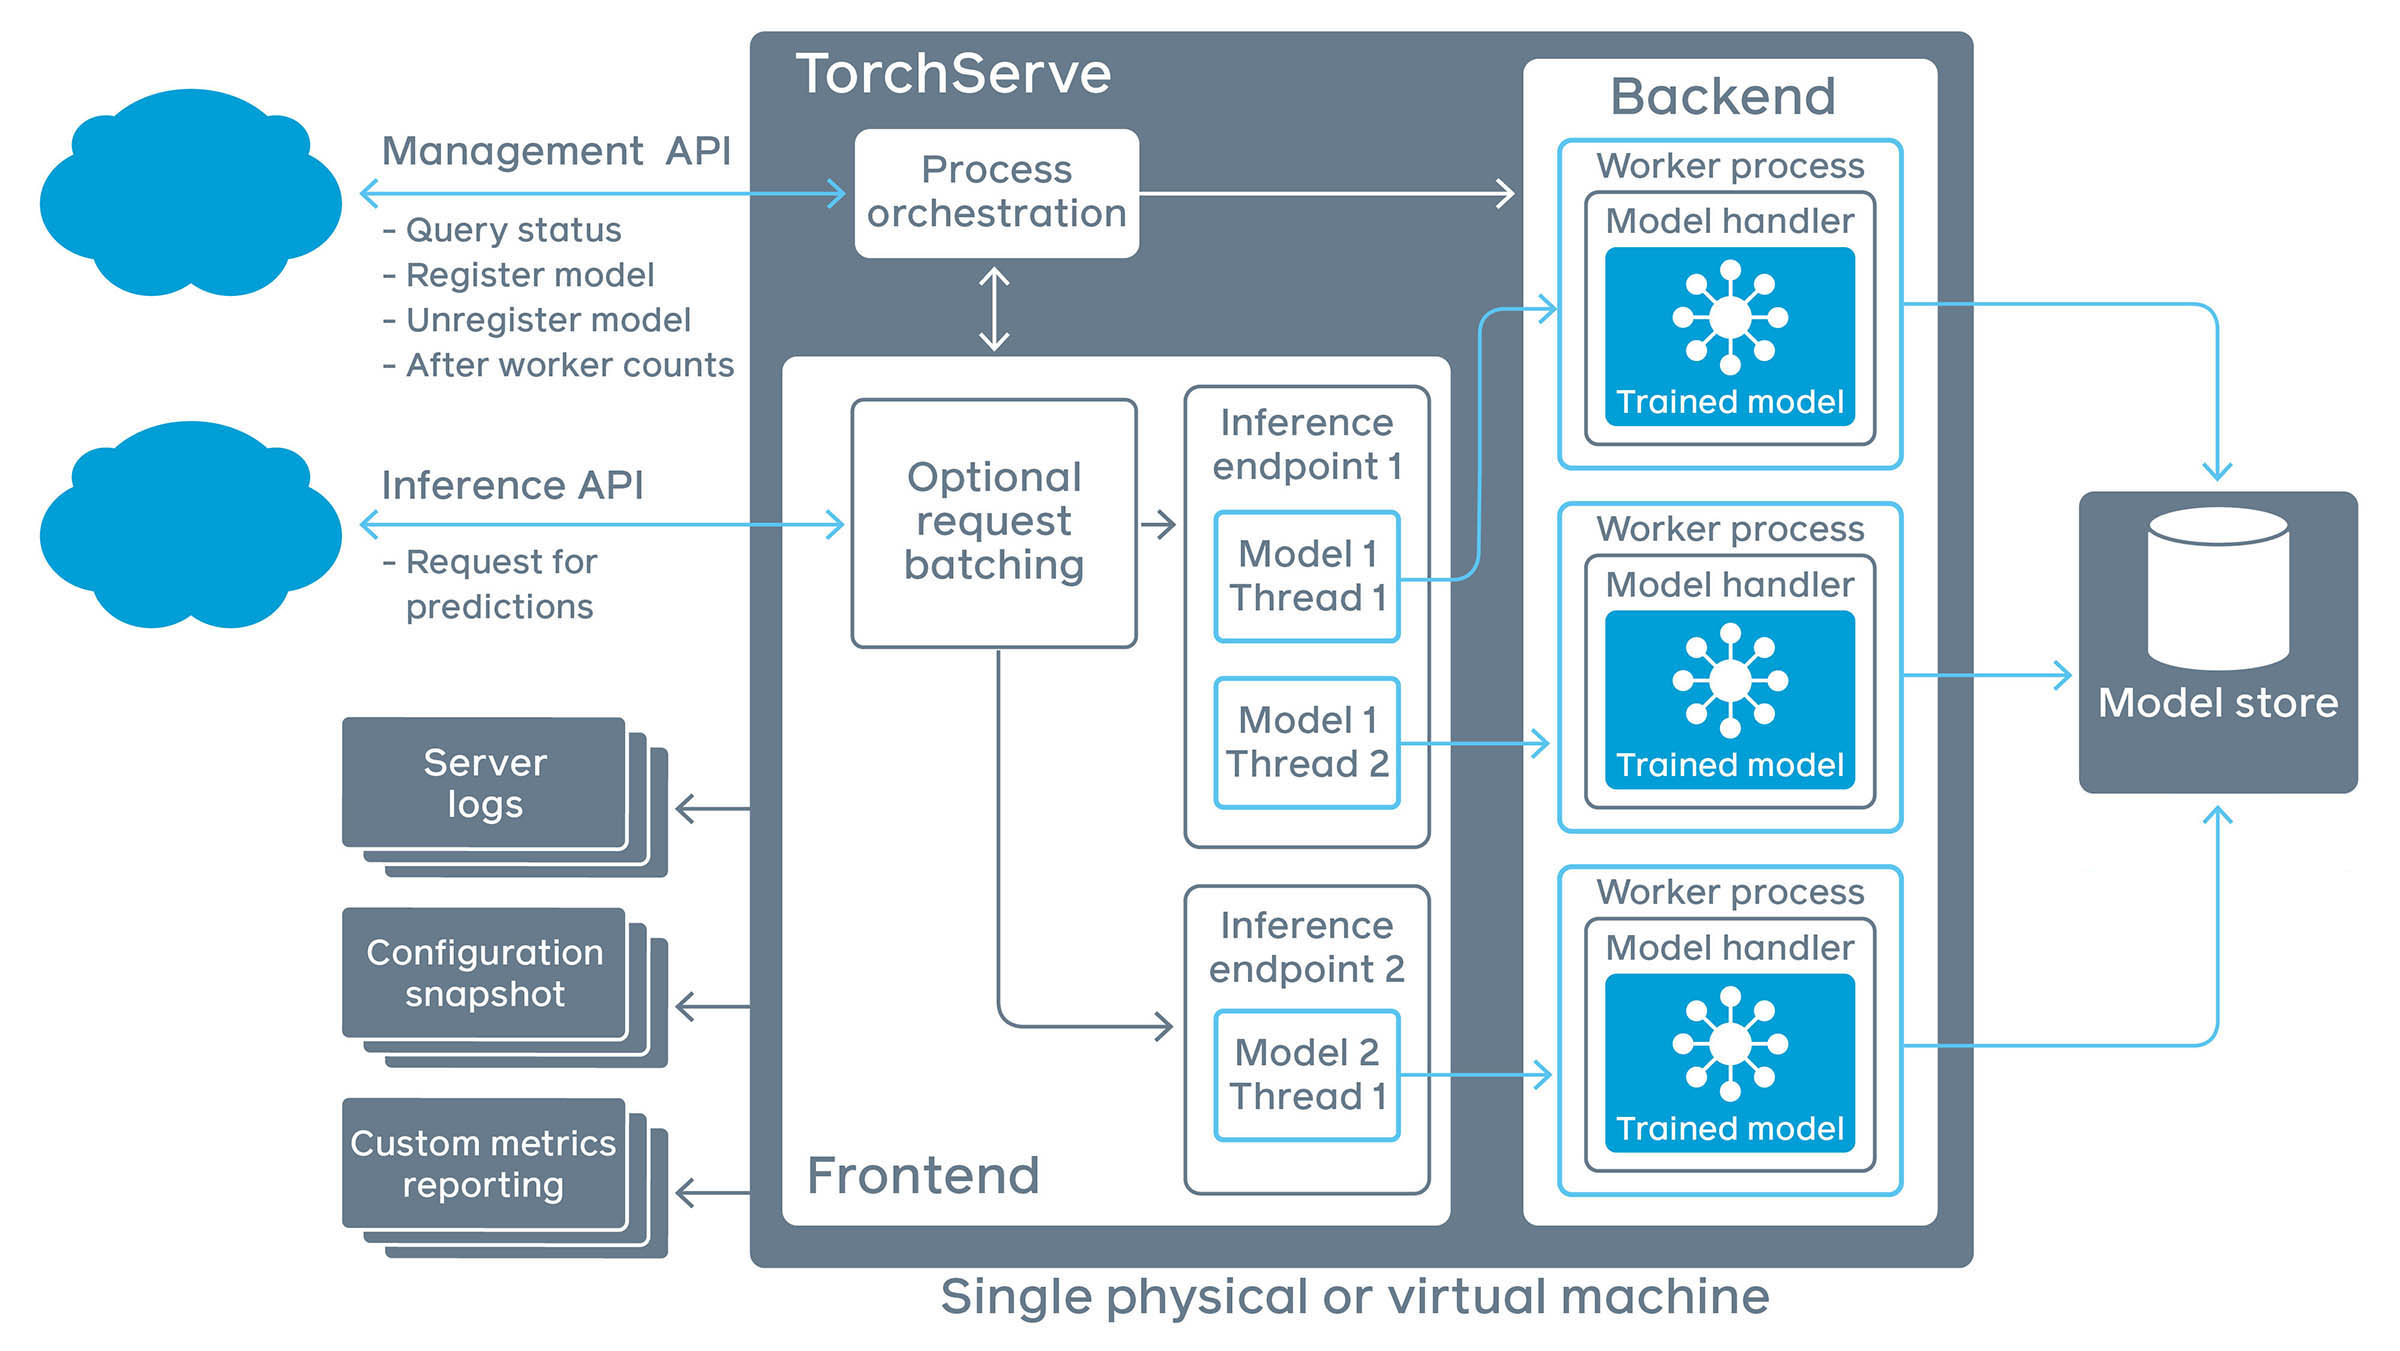
- 위의 그림에서 각각의 용어가 의미하는 바는 다음과 같다.
1] Frontend
- TorchServe의
request/response처리 구성 요소이다. - 클라이언트에서 오는
request/response를 모두 처리하고 모델의 라이프사이클을 관리한다.
2] Model Workers
- 모델에 대한 실제 추론을 담당하는 역할을 한다.
3] Model
- 모델은
script_module(JIT 모델) 또는eager_mode_models가 있다. - 이러한 모델을
handler에 넣어 구현하면 다양한 목적에 맞게 사용할 수 있다. - 모델은 클라우드 스토리지 또는 로컬 호스트에서 로드할 수 있다.
4] Plugins
- TorchServe를 시작할 때 넣어주는 인자와 같다.
- 사용자 지정 엔드포인트, authz/authn 등을 넣어줄 수 있다.
5] Model Store
- 로드 가능한 모델이 존재하는 디렉터리이다.
- TorchServe가 시작되면 이 디렉터리에 있는 모델을 참조한다.
2) TorchServe 및 Dependencies 설치
- Conda 가상환경으로 진행한다.
- 다음과 같이 TorchServe 깃헙을 클론한다.
serve라는 디렉터리가 생성되면, 내부로 들어간다.
- 먼저 Dependencies를 설치해야 하는데 CPU 버전과 GPU 버전 중 선택해서 설치한다.
- CPU 버전은 다음과 같이 설치한다.
- GPU 버전은 Cuda 버전에 맞게 설치한다.
- 옵션은
cu92,cu101,cu102,cu111이 있다.
- Dependencies를 설치한 후
torchserve,torch-model-archiver,torch-workflow-archiver를 설치한다.
- Conda 설치는 다음과 같다.
- Pip 설치는 다음과 같다.
3) 모델 서브(Serve)
- 다시 이전 디렉터리로 나온 후
model_store디렉터리를 생성한다.
- 모델을 다운로드한다.
- 모델을 서브하기 전에 MAR이라는 형태로 만들어주는 작업이 필요하다.
$(torchserve) torch-model-archiver --model-name densenet161 --version 1.0 --model-file ./serve/examples/image_classifier/densenet_161/model.py --serialized-file densenet161-8d451a50.pth --export-path model_store --extra-files ./serve/examples/image_classifier/index_to_name.json --handler image_classifier
torch-model-archiver의 옵션이 의미하는 바는 다음과 같다.
1] torch-model-archiver
- 사용할 모델을 MAR의 형태로 변환하는 명령어이다.
2] --model-name
- 사용할 모델의 이름이다.
- 모델은
model-name.mar로 지정된다. --export-path가 지정되지 않은 경우 현재 작업 디렉터리에 저장된다.
3] --serialized-file
- Eager 모드의 경우
state_dict를 포함하는.pt또는.pth파일의 경로이다. - TorchScript의 경우 실행 가능한 ScriptModule에 대한 경로이다.
4] --model-file
- 모델 아키텍처가 포함된 Python 스크립트의 경로이다.
- 이 매개변수는 Eager 모드 모델에는 필수적으로 들어간다.
- 모델 아키텍처 파일에는
torch.nn.modules에서 확장된 클래스 정의가 하나만 포함되어야 한다.
5] --handler
- 사용자 정의 추론 로직을 처리하기 위한 Python 스크립트의 경로이다.
- 이 스크립트 내부에는
Handler클래스,__init__메서드,initialize메서드,preprocess메서드,inference메서드,postprocess메서드,handle메서드가 구현되어야 한다.
6] --extra-files
- 인자는
,(콤마)로 구분되며, 모델 외의 추가 Dependency 파일의 경로이다.
7] --runtime
- 추론 코드를 실행할 언어를 지정한다.
- 기본 런타임은 Python이다.
8] --export-path
- 실행할 모델을
.mar파일로 만든 후 내보낼 경로이다. - 이 매개변수를 지정하지 않으면
.mar파일은 현재 작업 디렉터리에 저장된다.
9] --archive-format
- 모델 아티팩트(Artifacts)가 아카이브되는 형식을 지정한다.
10] --force
- 이 매개변수를 지정하면
--export-path에 의해 저장된 동일한 기존.mar파일이 있더라도 강제로 덮어쓰게 된다.
11] --requirements-file
- 모델별 Python Dependency 패키지에 대한
requirements.txt의 경로이다.
- 위의 코드를 실행하면
densenet161.mar이라는 파일이 생성되었으면 다음과 같이model_store디렉터리로 옮겨준다.
torchserve명령어와 옵션을 주면 TorchServe가 시작된다.
tochserve의 옵션이 의미하는 바는 다음과 같다.
1] --start
- 모델 서버를 시작한다.
2] --stop
- 모델 서버를 종료한다.
3] --ts-config
- 모델 서버의 구성을 다루는 파일의 경로이다.
4] --model-store
.mar파일이 존재하는 디렉터리
5] --workflow-store
- 워크플로우를 로드할 수 있는 디렉터리
6] --models
[model_name=]model_location형식을 사용하여 로드할 모델이다.model_location은model_store의HTTP URL또는.mar파일이다.
7] --log-config
- 모델 서버용 Log4j 구성 파일이다.
8] --foreground
- 이 옵션을 비활성화하면 모델 서버가 백그라운드에서 실행된다.
9] --no-config-snapshots
- 서버가 구성 스냅샷 파일을 저장하지 못하도록 한다.
10] --plugins-path
- TorchServe를 시작할 때 포함될 플러그인이다.
4) 추론 테스트
- 추론 테스트를 위해 다음과 같이 고양이 사진을 다운로드한다.
$(torchserve) curl -O https://raw.githubusercontent.com/pytorch/serve/master/docs/images/kitten_small.jpg
- 엔드포인트에 고양이 사진을 넘겨준다.
- 정상적으로 실행이 되었다면 다음과 같은 JSON 객체가 반환된다.
[
  {
    "tiger_cat": 0.46933549642562866
  },
  {
    "tabby": 0.4633878469467163
  },
  {
    "Egyptian_cat": 0.06456148624420166
  },
  {
    "lynx": 0.0012828214094042778
  },
  {
    "plastic_bag": 0.00023323034110944718
  }
]
- 클라이언트와의 모든 상호작용은
logs/디렉터리에 로깅된다.
References
- https://github.com/pytorch/serve
- https://medium.com/analytics-vidhya/deploy-huggingface-s-bert-to-production-with-pytorch-serve-27b068026d18
- https://github.com/pytorch/serve/blob/master/examples/Huggingface_Transformers/Transformer_handler_generalized.py
- https://pytorch.org/serve/configuration.html
- https://github.com/pytorch/serve/blob/master/docs/management_api.md#register-a-model
- https://towardsdatascience.com/serving-pytorch-models-with-torchserve-6b8e8cbdb632
- https://medium.com/analytics-vidhya/deploy-huggingface-s-bert-to-production-with-pytorch-serve-27b068026d18
- https://cceyda.github.io/blog/torchserve/streamlit/dashboard/2020/10/15/torchserve.html#What-is-Torchserve?