4. Docker Compose 서비스 만들기
1. 사용가능한 서버

- 특정 IP를 가진 서버(RTX2080TI 서버)를 통해야만 NIPA 서버에 접속할 수 있다.
- RTX2080TI 서버와 NIPA 서버 모두
9003번 포트가 열려 있다.
2. 서비스 아키텍처
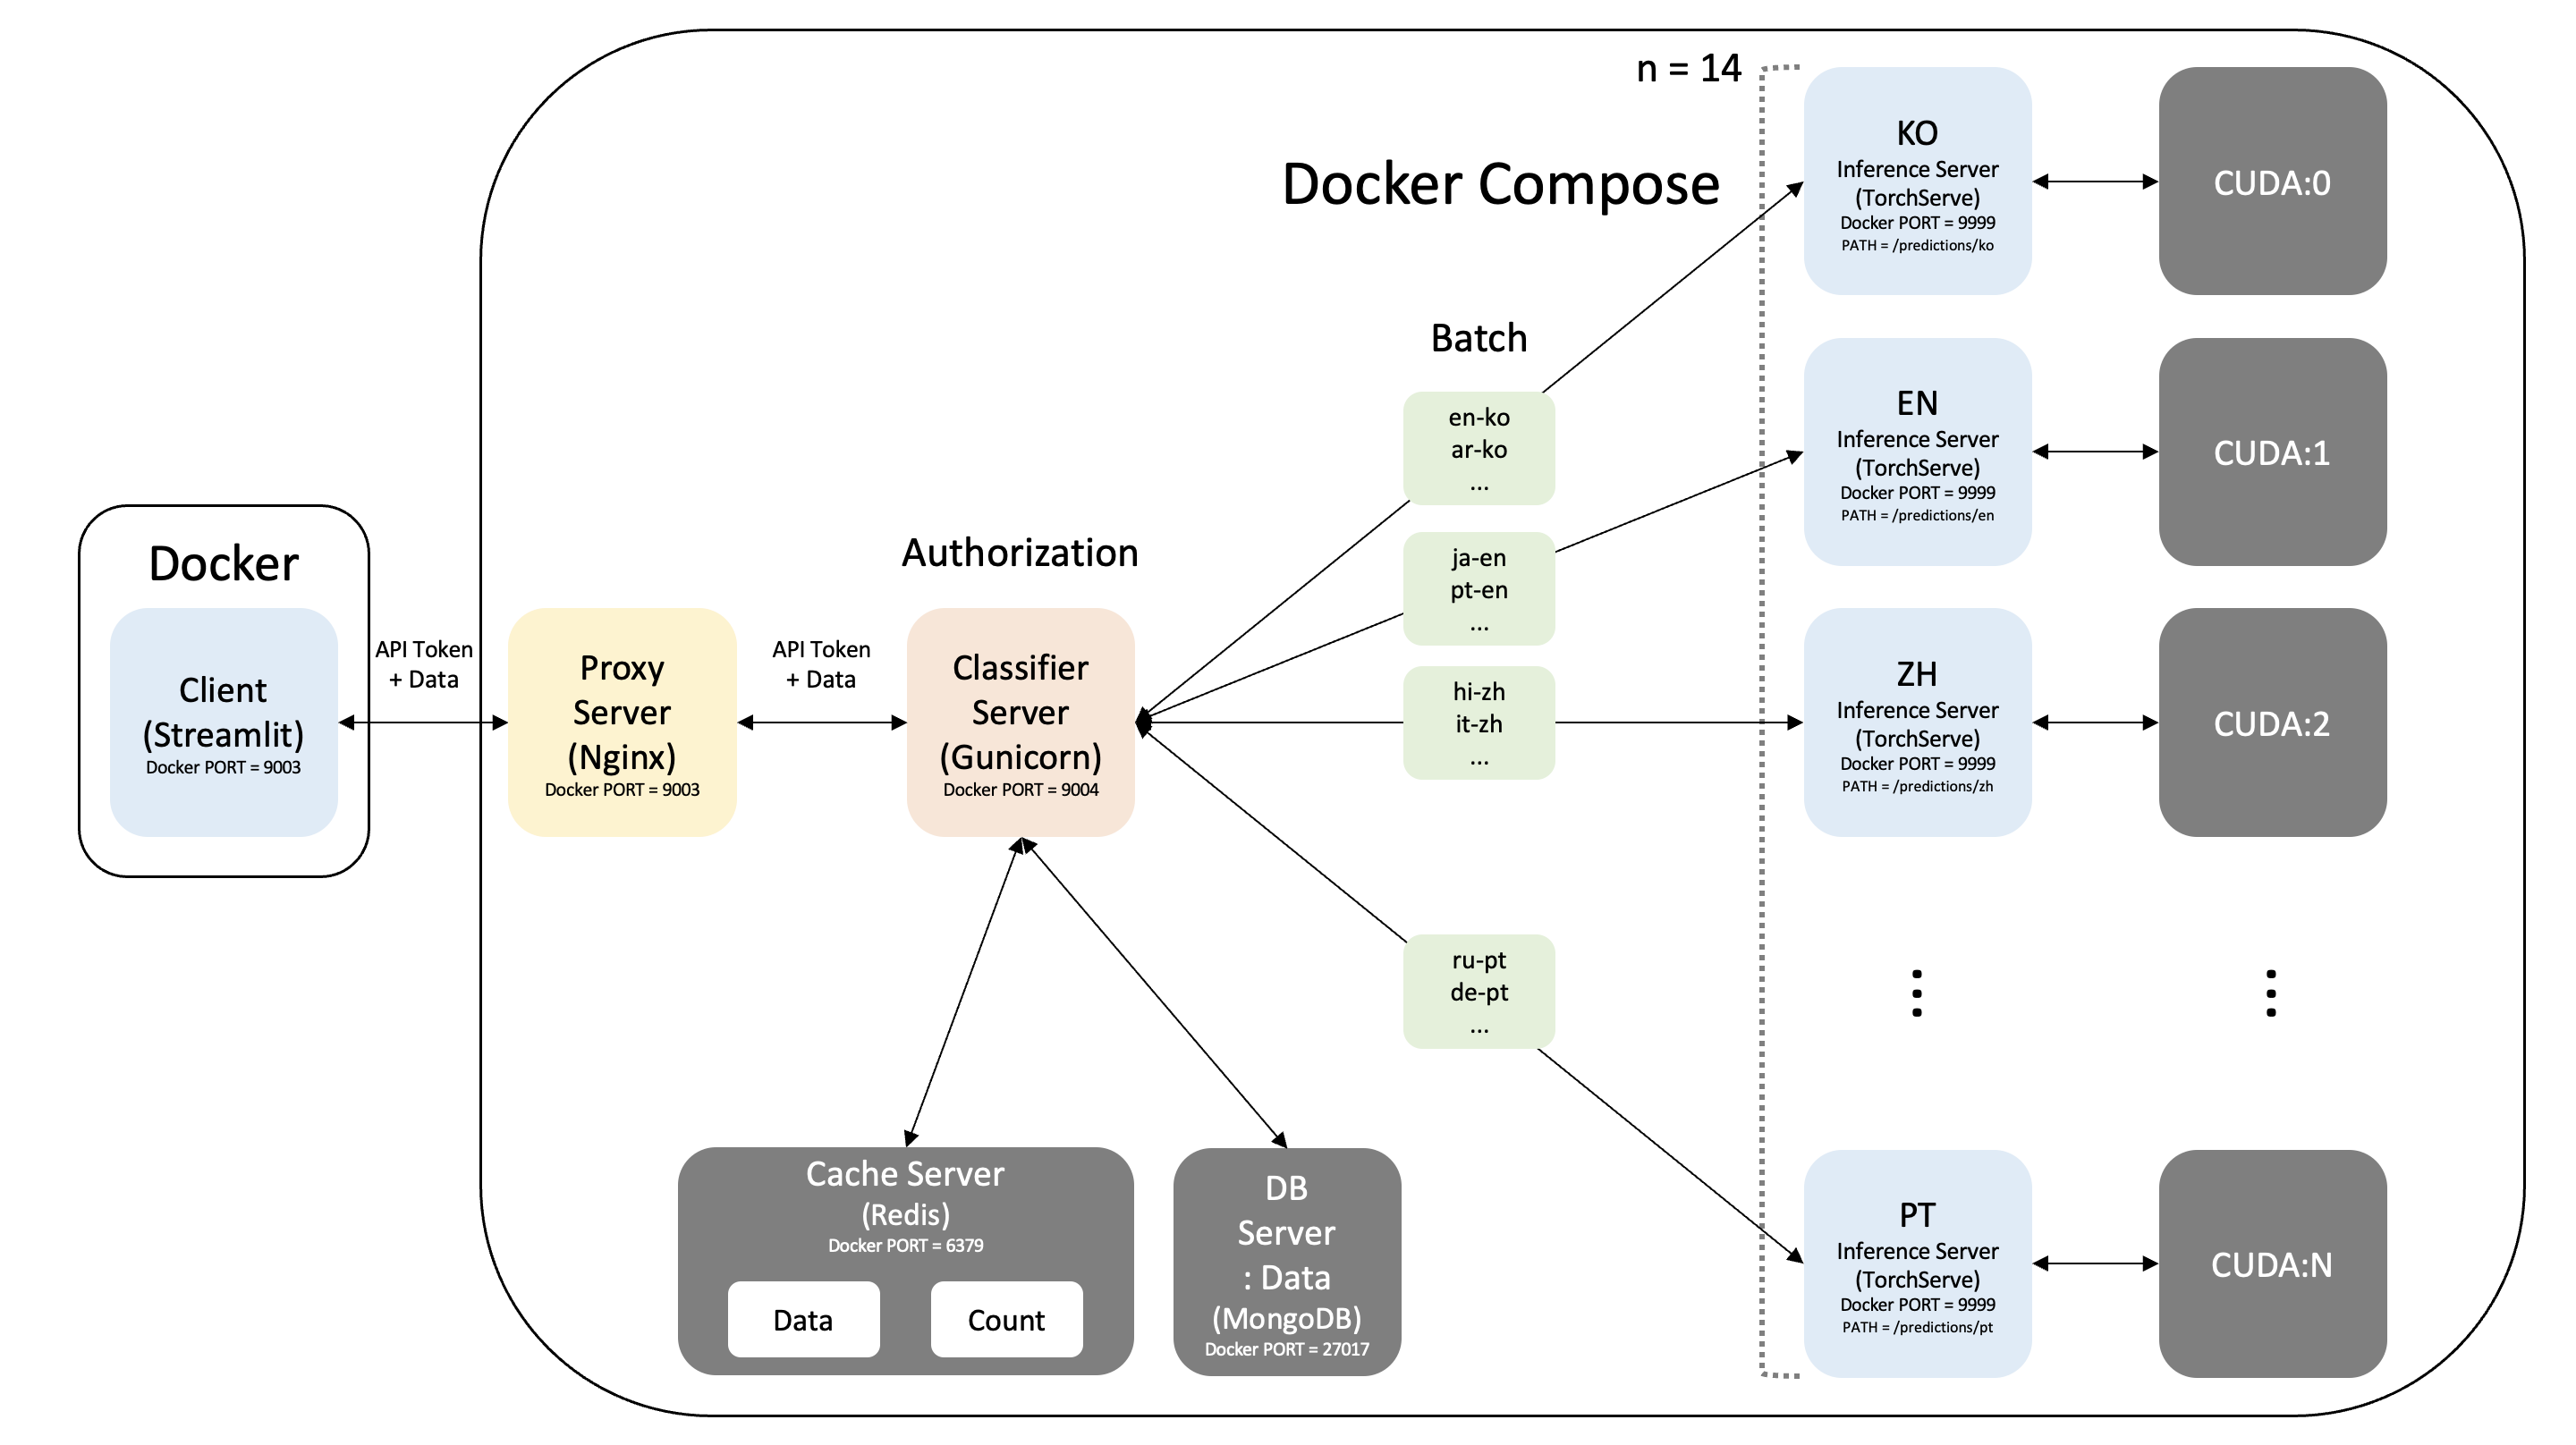
1) RTX2080TI 서버
- 클라이언트를 담당하는 서버
- Docker 환경
- Streamlit
2) NIPA 서버
- 서비스를 담당하는 서버
- Docker Compose 환경
1] Proxy Server
- Nginx
2] Classifier Server
- Gunicorn + Uvicorn + FastAPI
3] Inference Server
- TorchServe + Hugging Face + CUDA
4] Cache Server: Data / Count
- Redis
5] DB Server: Data
- MongoDB
3. 서버 기본 세팅
1) Docker 설치 (RTX2080TI 서버 및 NIPA 서버)
- 먼저, Docker를 설치한다.
sudo apt-get update
sudo apt-get install apt-transport-https ca-certificates curl gnupg lsb-release -y
sudo curl -fsSL https://download.docker.com/linux/ubuntu/gpg | sudo gpg --dearmor -o /usr/share/keyrings/docker-archive-keyring.gpg
sudo echo "deb [arch=amd64 signed-by=/usr/share/keyrings/docker-archive-keyring.gpg] https://download.docker.com/linux/ubuntu $(lsb_release -cs) stable" | sudo tee /etc/apt/sources.list.d/docker.list > /dev/null
sudo apt-get update
sudo apt-get install docker-ce docker-ce-cli containerd.io -y
sudo service docker status
- Docker 버전을 확인한다.
2) Docker Compose 설치 (NIPA 서버)
- Docker Compose를 사용할 수 있는지 확인한다.
- 위와 같이 사용이 불가능하다고 나오면 따로 설치를 해야 한다.
sudo curl -L "https://github.com/docker/compose/releases/download/1.29.2/docker-compose-$(uname -s)-$(uname -m)" -o /usr/local/bin/docker-compose
- 바이너리에 실행 권한을 적용한다.
- 설치 후 만약
docker-compose명령이 실패하면 경로를 확인한다. /usr/bin또는 경로의 다른 디렉터리에 대한 심볼릭 링크를 생성할 수도 있다.
- 설치가 완료되었는지 확인한다.
- Redis를 사용할 때 발생하는 Overcommit 에러를 방지하기 위해 다음과 같이
overcommit_memory값을 변경한다.
4. NIPA 서버
- NIPA 서버에서 현재 Docker의 정보를 먼저 확인한다.
Docker Root Dir: /var/lib/docker으로 확인되고, 현재 서버의 디스크 사용량 및 총 용량을 확인한다.- 여기서
df는 "Disk Free"의 약어이며,-h의 "h"는 "Human Readable"의 약어이다.
- 리스트를 확인해서 용량이 넉넉한 디렉터리가 있다면 그 디렉터리로 변경하기 위해 먼저 Docker 데몬을 종료한다.
- 현재 NIPA 서버에서는
/home디렉터리가 넉넉하기 때문에 다음과 같이 작성한다.
- 다시 Docker 데몬을 실행한다.
- 다시 Docker의 정보를 확인하면 바뀌어 있는 것을 확인할 수 있다.
- 이제, Docker Compose 구성을 위해 새로운 디렉터리를 생성한 후 작업한다.
mkdir ./docker_compose && \
  cd ./docker_compose && \
  mkdir -p ./proxy ./cache/data ./db/data ./inference ./classifier
- 현재 디렉터리 구조는 다음과 같다.
docker_compose
├── cache
│   └── data
├── classifier
├── db
│   └── data
├── inference
└── proxy

7 directories, 0 files
- 필요한 이미지들을 미리 가져온다.
sudo docker pull nginx && \
  sudo docker pull redis && \
  sudo docker pull mongo && \
  sudo docker pull ubuntu && \
  sudo docker pull nvidia/cuda:11.0-base
1) docker-compose.yml 작성
docker-compose.yml를 각 단계에 맞춰서 작성할 것인데, 먼저networks를 구성하고 마지막에 나머지를 작성한다.- 이때 다른 Docker 네트워크와 겹치지 않도록
subnet을 주의해서 설정해야 한다.
./docker-compose.yml
version: "3.8"

networks:
  net:
    ipam:
      driver: default
      config:
        - subnet: "172.18.1.0/16"
- 현재 디렉터리 및 파일 구조는 다음과 같다.
docker_compose
├── cache
│   └── data
├── classifier
├── db
│   └── data
├── docker-compose.yml
├── inference
└── proxy

7 directories, 1 file
2) Proxy Server
- Proxy Server는
nginx:latest이미지를 이용하고, 현재 버전은 다음과 같다.
nginx이미지를 이용하여 컨테이너를 만들면 웬만한 기본 설정은 다 되어있다.- 그리고 가장 중요한
ulimit의open files값 또한master와worker모두1048576으로 설정되어 있다.
- 설정 파일은 직접 작성한다.
./proxy/nginx.conf
user www-data;
worker_processes 10; # 동시에 Requests 받을 수 있는 수 = worker_processes * worker_connections
pid /run/nginx.pid;
include /etc/nginx/modules-enabled/*.conf;
# worker_rlimit_nofile 2048;

events {
        worker_connections 4096; # Reverse Proxy이므로 2배 설정
        multi_accept on;
        use epoll;
}

http {

        ##
        # Basic Settings
        ##

        sendfile on;
        tcp_nopush on;
        tcp_nodelay on;

        ##
        # Upstream Settings
        ##

        upstream application {
            server nmt_classifier:8888;
        }

        ##
        # Server Settings
        ##

        server {
                listen 80;
                server_name localhost;

                location / {
                        proxy_pass http://application;
                }

                error_page 500 502 503 504 /50x.html;
                location = /50x.html {
                        root /usr/share/nginx/html;
                }
        }

        ##
        # Timeout Settings
        ##

        # keepalive_timeout 86400; # Connection 시간
        # keepalive_reqeusts 100 # Connection 횟수

        client_body_timeout 86400; # Client로부터 request body를 받는 시간
        send_timeout 86400; # Client에게 response body를 보내는 시간
        reset_timedout_connection off; # Timeout으로 Connection이 끊긴 경우 리셋

        proxy_connect_timeout 86400; # Proxy 서버와 연결되는 시간 (75초를 초과할 수 없음)
        proxy_send_timeout 86400; # Proxy 서버에 요청을 보내는 시간
        proxy_read_timeout 86400; # Proxy 서버에서 응답을 받는 시간

        types_hash_max_size 2048;
        # server_tokens off;

        # server_names_hash_bucket_size 64;
        # server_name_in_redireict off;

        include /etc/nginx/mime.types;
        default_type application/octet-stream;

        ##
        # SSL Settings
        ##

        ssl_protocols TLSv1 TLSv1.1 TLSv1.2 TLSv1.3; # Dropping SSLv3, ref: POODLE
        ssl_prefer_server_ciphers on;

        ##
        # Logging Settings
        ##

        access_log /var/log/nginx/access.log;
        error_log /var/log/nginx/error.log;

        ##
        # Gzip Settings
        ##

        gzip on;

        ##
        # Virtual Host Configs
        ##

        # include /etc/nginx/conf.d/*.conf;
        include /etc/nginx/sites-enabled/*;
}
- 현재 디렉터리 및 파일 구조는 다음과 같다.
docker_compose
├── cache
│   └── data
├── classifier
├── db
│   └── data
├── docker-compose.yml
├── inference
└── proxy
    └── nginx.conf

7 directories, 2 files
3) Cache Server: Data / Count
- Cache Server: Data / Count는
redis:latest이미지를 이용하고, 현재 버전은 다음과 같다.
redis이미지를 이용하여 컨테이너를 만들면 웬만한 기본 설정은 다 되어있다.- 하지만
maxmemory및maxmemory-policy, 그리고 이외의 설정을 조금 수정해야 하기 때문에 설정 파일을 작성한다.
./cache/redis.conf
# Working Directory
dir ./data

# Memory
maxmemory 10g
maxmemory-policy allkeys-lru

# AOF
appendonly yes
appendfsync everysec

# RDB(Snapshot)
save 900 1
save 300 10
save 60 10000

# File Name
appendfilename "appendonly.aof"
dbfilename dump.rdb

# Others
stop-writes-on-bgsave-error no
- 현재 디렉터리 및 파일 구조는 다음과 같다.
docker_compose
├── cache
│   ├── data
│   └── redis.conf
├── classifier
├── db
│   └── data
├── docker-compose.yml
├── inference
└── proxy
    └── nginx.conf

7 directories, 3 files
4) DB Server: Data
- DB Server: Data는
mongo:latest이미지를 이용하고, 현재 버전은 다음과 같다.
$ mongo --version
MongoDB shell version v5.0.3
Build Info: {
    "version": "5.0.3",
    "gitVersion": "657fea5a61a74d7a79df7aff8e4bcf0bc742b748",
    "openSSLVersion": "OpenSSL 1.1.1f  31 Mar 2020",
    "modules": [],
    "allocator": "tcmalloc",
    "environment": {
        "distmod": "ubuntu2004",
        "distarch": "x86_64",
        "target_arch": "x86_64"
    }
}
- 설정 파일은 건드리지 않는다.
5) Inference Server
- Inference Server는 CUDA를 사용해야 한다.
- 위에서 이미
docker pull로 가져오기는 했지만, 먼저 NIPA 서버의 CUDA 버전부터 확인해야 한다.
+-----------------------------------------------------------------------------+
| NVIDIA-SMI 450.102.04   Driver Version: 450.102.04   CUDA Version: 11.0     |
|-------------------------------+----------------------+----------------------+
| GPU  Name        Persistence-M| Bus-Id        Disp.A | Volatile Uncorr. ECC |
| Fan  Temp  Perf  Pwr:Usage/Cap|         Memory-Usage | GPU-Util  Compute M. |
|                               |                      |               MIG M. |
|===============================+======================+======================|
|   0  A100-PCIE-40GB      On   | 00000000:00:06.0 Off |                    0 |
| N/A   31C    P0    31W / 250W |      0MiB / 40537MiB |      0%      Default |
|                               |                      |             Disabled |
+-------------------------------+----------------------+----------------------+
|   1  A100-PCIE-40GB      On   | 00000000:00:07.0 Off |                    0 |
| N/A   31C    P0    32W / 250W |      0MiB / 40537MiB |      0%      Default |
|                               |                      |             Disabled |
+-------------------------------+----------------------+----------------------+

+-----------------------------------------------------------------------------+
| Processes:                                                                  |
|  GPU   GI   CI        PID   Type   Process name                  GPU Memory |
|        ID   ID                                                   Usage      |
|=============================================================================|
|  No running processes found                                                 |
+-----------------------------------------------------------------------------+
- 위에서 이미 가져온
nvidia/cuda:11.0-base이미지를 이용한다.
- Docker에서
nvidia이미지로 컨테이너 생성 시 에러가 발생할 것이다. - 그럼 다음과 같이 Nvidia Repository를 추가한 후
nvidia-container-toolkit을 설치하면 된다.
distribution=$(. /etc/os-release;echo $ID$VERSION_ID) && \
  sudo curl -s -L https://nvidia.github.io/nvidia-docker/gpgkey | sudo apt-key add - && \
  sudo curl -s -L https://nvidia.github.io/nvidia-docker/$distribution/nvidia-docker.list | sudo tee /etc/apt/sources.list.d/nvidia-docker.list
sudo apt-get update && sudo apt-get install nvidia-container-toolkit -y
sudo systemctl restart docker
- 먼저 Hugging Face로 불러올 모델을 준비해야 한다.
- 하지만 RTX2080TI 서버에서만 NIPA 서버로 데이터를 전송할 수 있다.
- NIPA 서버에서 RTX2080TI 서버에 준비되어 있는 모델을
scp명령어로 가져온다.
- RTX2080TI 서버에서 가져온 모델의 압축을 해제한다.
tar xvfz ./inference/*.tar.gz && \
  sudo rm ./inference/*.tar.gz && \
  mv ./voiceprint ./inference/voiceprint
- 각 언어마다 사용하는 CUDA를 지정하기 위해서 설정 파일을 작성한다.
./inference/voiceprint/m2m100_418M/setup_config.json
{
  "cuda_id": {
    "ko": "0",
    "en": "0",
    "zh-cn": "0",
    "zh-tw": "0",
    "es": "0",
    "fr": "0",
    "ru": "0",
    "id": "0",
    "ja": "1",
    "vi": "1",
    "de": "1",
    "it": "1",
    "hi": "1",
    "ar": "1",
    "pt": "1",
    "tl": "1"
  }
}
- TorchServe 실행 시 필요한 설정 파일을 작성한다.
./inference/config.properties
# Configure TorchServe listening address and port
inference_address=http://172.18.1.5:9999
management_address=http://172.18.1.5:8081
metrics_address=http://172.18.1.5:8082

# Limit GPU usage
number_of_gpu=0

# Load models at startup
model_store=./model_store
load_models=all

# Other properties
# Worker / Capacity
default_workers_per_model=1
job_queue_size=4096
default_response_timeout=86400

# Models(Override)
models={\
    "ko": {\
        "1.0": {\
            "defaultVersion": true,\
            "marName": "ko.mar",\
            "minWorkers": 1,\
            "maxWorkers": 1,\
            "batchSize": 64,\
            "maxBatchDelay": 100\
        }\
    },\
    "en": {\
        "1.0": {\
            "defaultVersion": true,\
            "marName": "en.mar",\
            "minWorkers": 1,\
            "maxWorkers": 1,\
            "batchSize": 64,\
            "maxBatchDelay": 100\
        }\
    },\
    "zh-cn": {\
        "1.0": {\
            "defaultVersion": true,\
            "marName": "zh-cn.mar",\
            "minWorkers": 1,\
            "maxWorkers": 1,\
            "batchSize": 64,\
            "maxBatchDelay": 100\
        }\
    },\
    "zh-tw": {\
        "1.0": {\
            "defaultVersion": true,\
            "marName": "zh-tw.mar",\
            "minWorkers": 1,\
            "maxWorkers": 1,\
            "batchSize": 64,\
            "maxBatchDelay": 100\
        }\
    },\
    "es": {\
        "1.0": {\
            "defaultVersion": true,\
            "marName": "es.mar",\
            "minWorkers": 1,\
            "maxWorkers": 1,\
            "batchSize": 64,\
            "maxBatchDelay": 100\
        }\
    },\
    "fr": {\
        "1.0": {\
            "defaultVersion": true,\
            "marName": "fr.mar",\
            "minWorkers": 1,\
            "maxWorkers": 1,\
            "batchSize": 64,\
            "maxBatchDelay": 100\
        }\
    },\
    "ru": {\
        "1.0": {\
            "defaultVersion": true,\
            "marName": "ru.mar",\
            "minWorkers": 1,\
            "maxWorkers": 1,\
            "batchSize": 64,\
            "maxBatchDelay": 100\
        }\
    },\
    "id": {\
        "1.0": {\
            "defaultVersion": true,\
            "marName": "id.mar",\
            "minWorkers": 1,\
            "maxWorkers": 1,\
            "batchSize": 64,\
            "maxBatchDelay": 100\
        }\
    },\
    "ja": {\
        "1.0": {\
            "defaultVersion": true,\
            "marName": "ja.mar",\
            "minWorkers": 1,\
            "maxWorkers": 1,\
            "batchSize": 64,\
            "maxBatchDelay": 100\
        }\
    },\
    "vi": {\
        "1.0": {\
            "defaultVersion": true,\
            "marName": "vi.mar",\
            "minWorkers": 1,\
            "maxWorkers": 1,\
            "batchSize": 64,\
            "maxBatchDelay": 100\
        }\
    },\
    "de": {\
        "1.0": {\
            "defaultVersion": true,\
            "marName": "de.mar",\
            "minWorkers": 1,\
            "maxWorkers": 1,\
            "batchSize": 64,\
            "maxBatchDelay": 100\
        }\
    },\
    "it": {\
        "1.0": {\
            "defaultVersion": true,\
            "marName": "it.mar",\
            "minWorkers": 1,\
            "maxWorkers": 1,\
            "batchSize": 64,\
            "maxBatchDelay": 100\
        }\
    },\
    "hi": {\
        "1.0": {\
            "defaultVersion": true,\
            "marName": "hi.mar",\
            "minWorkers": 1,\
            "maxWorkers": 1,\
            "batchSize": 64,\
            "maxBatchDelay": 100\
        }\
    },\
    "ar": {\
        "1.0": {\
            "defaultVersion": true,\
            "marName": "ar.mar",\
            "minWorkers": 1,\
            "maxWorkers": 1,\
            "batchSize": 64,\
            "maxBatchDelay": 100\
        }\
    },\
    "pt": {\
        "1.0": {\
            "defaultVersion": true,\
            "marName": "pt.mar",\
            "minWorkers": 1,\
            "maxWorkers": 1,\
            "batchSize": 64,\
            "maxBatchDelay": 100\
        }\
    },\
    "tl": {\
        "1.0": {\
            "defaultVersion": true,\
            "marName": "tl.mar",\
            "minWorkers": 1,\
            "maxWorkers": 1,\
            "batchSize": 64,\
            "maxBatchDelay": 100\
        }\
    }\
}
- MAR 형식의 파일을 생성하기 위해 필요한 핸들러 스크립트 파일도 작성한다.
./inference/handler.py
import ast
import logging
import os
import json
import torch
from abc import ABC
from transformers import M2M100ForConditionalGeneration, AutoTokenizer
from ts.torch_handler.base_handler import BaseHandler

logger = logging.getLogger(__name__)

class InferenceHandler(BaseHandler, ABC):
    def __init__(self):
        super(InferenceHandler, self).__init__()
        self.initialized = False

    def initialize(self, ctx):
        self.PID = os.getpid()
        self.manifest = ctx.manifest
        properties = ctx.system_properties
        model_dir = properties.get("model_dir")
        self.tgt_lang = self.manifest["model"]["modelName"]
        setup_config_path = os.path.join(model_dir, "setup_config.json")

        with open(setup_config_path) as setup_config_file:
            self.setup_config = json.load(setup_config_file)

        self.device = "cuda:" + self.setup_config["cuda_id"][self.tgt_lang]
        self.model = M2M100ForConditionalGeneration.from_pretrained(model_dir)
        self.model.to(self.device)
        self.tokenizer = AutoTokenizer.from_pretrained(model_dir)

        logger.info(f"\nPID: {self.PID} / Tgt_Lang: {self.tgt_lang} / Device: {self.device}\nMANIFEST: {self.manifest}\nPROPERTIES: {properties}\n{model_dir} loaded successfully\n")

        self.initialized = True

    def preprocess(self, requests):
        logger.info(f"\nPID: {self.PID} / Tgt_Lang: {self.tgt_lang} / Device: {self.device}\nLength of Requests: {len(requests)}\nRequests: {requests}\n")

        input_ids_batch, attention_mask_batch = None, None
        input_ids_list, attention_mask_list = [], []
        max_length = 0

        # requests마다 for문 돌리기
        for idx, data in enumerate(requests):
            # data 파싱
            p = data.get("data")

            if p is None:
                p = data.get("body")

            if isinstance(p, (bytes, bytearray)):
                p = ast.literal_eval(p.decode("utf-8"))

            src_lang = p["src_lang"]
            src_text = p["src_text"]

            logger.info(f"\nPID: {self.PID} / Tgt_Lang: {self.tgt_lang} / Device: {self.device}\nSrc_Lang: {src_lang} / Src_Text: {src_text}\n")

            # tokenizer src_lang 바꾸기
            self.tokenizer.src_lang = "zh" if src_lang == "zh-cn" or src_lang == "zh-tw" else src_lang
            # tokenizer에 src_text 넣어서 {"input_ids": Tensor, "attention_mask": Tensor} 만들기
            inputs = self.tokenizer(src_text, padding=True, truncation=True, return_tensors='pt')

            # input_ids, attention_mask 꺼내기
            input_ids = inputs["input_ids"].to(self.device)
            attention_mask = inputs["attention_mask"].to(self.device)

            # input_ids_list, attention_mask_list에 넣기
            input_ids_list.append(input_ids)
            attention_mask_list.append(attention_mask)

            # requests에 들어온 src_text의 max_length 구하기 -> padding에 쓰기
            if input_ids.shape is not None:
                if input_ids.shape[1] >= max_length:
                    max_length = input_ids.shape[1]

        # input_ids_list의 index 수만큼 돌리기
        for i in range(len(input_ids_list)):
            # 현재 index의 length 구하기
            length = input_ids_list[i].shape[1]
            # (max_length - length)로 padding에 쓸 길이 구하기
            pad_length = max_length - length
            # pad_ones는 input_ids에 들어가는 pad_token_id
            pad_ones = torch.ones(1, pad_length, dtype=torch.long).to(self.device)
            # pad_zeros는 attention_mask에 들어가는 pad_token_id
            pad_zeros = torch.zeros(1, pad_length, dtype=torch.long).to(self.device)

            # padding
            input_ids_list[i] = torch.cat((input_ids_list[i], pad_ones), dim=1)
            attention_mask_list[i] = torch.cat((attention_mask_list[i], pad_zeros), dim=1)

            # input_ids_batch, attention_mask_batch에 넣기
            if input_ids.shape is not None:
                if input_ids_batch is None:
                    input_ids_batch = input_ids_list[i]
                    attention_mask_batch = attention_mask_list[i]
                else:
                    input_ids_batch = torch.cat((input_ids_batch, input_ids_list[i]), dim=0)
                    attention_mask_batch = torch.cat((attention_mask_batch, attention_mask_list[i]), dim=0)

        return (input_ids_batch, attention_mask_batch)

    def inference(self, preprocessed):
        input_ids_batch, attention_mask_batch = preprocessed
        encoded_batch = {"input_ids": input_ids_batch, "attention_mask": attention_mask_batch}

        # generate에 {"input_ids": Tensor[[], [], ...], "attention_mask": Tensor[[], [], ...]} 넣고 batch로 돌리기
        generated_tokens = self.model.generate(
            **encoded_batch,
            forced_bos_token_id=self.tokenizer.get_lang_id("zh" if self.tgt_lang == "zh-cn" or self.tgt_lang == "zh-tw" else self.tgt_lang),
            num_beams=5,
        )
        # batch_decode로 generated_tokens를 batch로 돌리기
        translated_batch = self.tokenizer.batch_decode(generated_tokens, skip_special_tokens=True)

        logger.info(f"\nPID: {self.PID} / Tgt_Lang: {self.tgt_lang} / Device: {self.device}\nTranslated: {translated_batch}\n")

        return translated_batch

    def postprocess(self, inferred_batch):
        # outputs 형식에 맞게 만들기
        postprocessed = [{"tgt_text": tgt_text} for tgt_text in inferred_batch]

        return postprocessed

    def handle(self, requests, context):
        self.context = context

        preprocessed = self.preprocess(requests)
        inferred_batch = self.inference(preprocessed)
        postprocessed = self.postprocess(inferred_batch)

        return postprocessed
- 이제 MAR 형식의 파일 생성 및 TorchServe 실행과 관련된 Bash 스크립트를 작성한다.
./inference/torchserve.sh
#!/bin/bash

initialize() {
        if [ ! -d ./handlers ]; then mkdir ./handlers; fi
        if [[ $(ls ./handlers/ | wc -l) > 0 ]]; then rm ./handlers/*; fi
        if [ -d ./logs ]; then rm -rf ./logs; fi
        if [ ! -d ./model_store ]; then mkdir ./model_store; fi
        if [[ $(ls ./model_store/ | wc -l) > 0 ]]; then rm ./model_store/*; fi
        if [ -f ./main_model_dirlist.txt ]; then rm ./main_model_dirlist.txt; fi
        if [ -f ./sub_model_dirlist.txt ]; then rm ./sub_model_dirlist.txt; fi
}

create_model_names() {
        arr=$2[@]
        model_names=("${!arr}")

        if [ -f ./$1_model_names.txt ]; then rm ./$1_model_names.txt; fi

        for model_name in "${model_names[@]}";
        do
                echo $model_name >> ./$1_model_names.txt
        done
}

create_handlers() {
        cat ./$1_model_names.txt | parallel -k cp ./handler.py ./handlers/{}.py
}

create_files() {
        echo | ls $2 > ./$1_model_dirlist.txt
        readarray files < ./$1_model_dirlist.txt

        if [ -f ./$1_model_dirlist.txt ]; then rm ./$1_model_dirlist.txt; fi

        for ids in ${!files[@]}
        do
                if [[ "${files[$ids]}" =~ ".bin" ]]; then
                        model_file=${files[$ids]}
                        files_len=$((files_len-1))
                else
                        file_name=${files[$ids]}
                        extra_files_args=$extra_files_args$2/$file_name,
                fi
        done
        extra_files_args=`echo $extra_files_args | tr -d ' '`
        extra_files_args=${extra_files_args%?}

        echo "$model_file $extra_files_args"
}

create_mars() {
        echo Torch Model Archiver Start - $1...

        cat ./$1_model_names.txt | parallel -k time torch-model-archiver --model-name {} --version $2 --serialized-file $3/$4 --handler ./handlers/{}.py --extra-files $5 && \
        cat ./$1_model_names.txt | parallel -k mv ./{}.mar ./model_store/{}.mar && \
        sleep 1s

        if [ -f ./$1_model_names.txt ]; then rm ./$1_model_names.txt; fi
}

main_model_names=("ko" "en" "zh-cn" "zh-tw" "es" "fr" "ru" "id" "ja" "vi" "de" "it" "hi" "ar" "pt" "tl")
sub_model_names=()

main_model_dir=./voiceprint/m2m100_418M
sub_model_dir="sub_model_dir"

model_ver=1.0
initialize

create_model_names "main" main_model_names
if [[ ${#sub_model_names[@]} > 0 ]]; then
        create_model_names "sub" sub_model_names
fi

create_handlers "main"
if [[ ${#sub_model_names[@]} > 0 ]]; then
        create_handlers "sub"
fi

readarray main_files <<< "$(create_files 'main' $main_model_dir)"
if [[ ${#sub_model_names[@]} > 0 ]]; then
        readarray sub_files <<< "$(create_files 'sub' $sub_model_dir)"
fi

create_mars "main" $model_ver $main_model_dir ${main_files[0]} ${main_files[1]}
if [[ ${#sub_model_names[@]} > 0 ]]; then
        create_mars "sub" $model_ver $sub_model_dir ${sub_files[0]} ${sub_files[1]}
fi

torchserve --start --ts-config ./config.properties
while true; do echo 'TorchServe Running...'; sleep 1s; done
- Anaconda 환경에서 실행할 것이기 때문에 초기화 파일도 작성한다.
./inference/conda_init.txt
__conda_setup="$('/root/anaconda3/bin/conda' 'shell.bash' 'hook' 2> /dev/null)"
if [ $? -eq 0 ]; then
    eval "$__conda_setup"
else
    if [ -f "/root/anaconda3/etc/profile.d/conda.sh" ]; then
        . "/root/anaconda3/etc/profile.d/conda.sh"
    else
        export PATH="/root/anaconda3/bin:$PATH"
    fi
fi
unset __conda_setup
- 이제 모델과 다른 설정 파일, Python Dependencies 설치도 고려하여
Dockerfile을 작성한다.
./inference/Dockerfile
FROM nvidia/cuda:11.0-base

ARG DEBIAN_FRONTEND=noninteractive
ENV TZ=Asia/Seoul
ENV PATH /root/anaconda3/bin:$PATH

COPY ./inference/conda_init.txt /inference/conda_init.txt

RUN chsh root -s /bin/bash

RUN apt-get update
RUN apt-get install sudo -y && \
    apt-get install vim -y && \
    apt-get install htop -y && \
    apt-get install curl -y && \
    apt-get install wget -y && \
    apt-get install tmux -y && \
    apt-get install git -y && \
    apt-get install tzdata -y && \
    apt-get install parallel -y

RUN echo "set encoding=utf-8" >> /etc/vim/vimrc && \
    echo "set fileencodings=utf-8,cp949" >> /etc/vim/vimrc

RUN curl -O https://repo.anaconda.com/archive/Anaconda3-2021.05-Linux-x86_64.sh && \
    bash Anaconda3-2021.05-Linux-x86_64.sh -b && \
    rm Anaconda3-2021.05-Linux-x86_64.sh

WORKDIR /inference

RUN mkdir ./handlers
RUN cat ./conda_init.txt >> ~/.bashrc && \
    rm ./conda_init.txt

RUN /bin/bash -c "source ~/.bashrc"
RUN /bin/bash -c "source activate"
RUN conda update conda -y

RUN git clone https://github.com/pytorch/serve.git
RUN mv ./serve/ts_scripts . && \
    mv ./serve/requirements . && \
    rm -rf ./serve

RUN python ./ts_scripts/install_dependencies.py --cuda=cu111
RUN pip install torchserve torch-model-archiver torch-workflow-archiver sentencepiece
RUN conda install -c huggingface transformers -y

RUN rm -rf ./ts_scripts && \
    rm -rf ./requirements
- 현재 디렉터리 및 파일 구조는 다음과 같다.
docker_compose
├── cache
│   ├── data
│   └── redis.conf
├── classifier
├── db
│   └── data
├── docker-compose.yml
├── inference
│   ├── conda_init.txt
│   ├── config.properties
│   ├── Dockerfile
│   ├── handler.py
│   ├── torchserve.sh
│   └── voiceprint
│       └── m2m100_418M
│           ├── config.json
│           ├── pytorch_model.bin
│           ├── sentencepiece.bpe.model
│           ├── setup_config.json
│           ├── special_tokens_map.json
│           ├── tokenizer_config.json
│           └── vocab.json
└── proxy
    └── nginx.conf

9 directories, 15 files
6) Classifier Server
- Classifier Server는
ubuntu:latest이미지를 이용하여 구축한다. - 하지만 NIPA 서버의 Classifier Server뿐만 아니라 RTX2080TI 서버의 Client에서도 Anaconda 환경이 필요하기 때문에 중간 지점에서 커밋 후 푸시할 것이다.
ubuntu이미지를 컨테이너로 만들어 실행한다.
- 필요한 툴을 설치한다.
apt-get update && \
  apt-get install sudo -y && \
  apt-get install vim -y && \
  apt-get install htop -y && \
  apt-get install curl -y && \
  apt-get install wget -y && \
  apt-get install tmux -y && \
  apt-get install git -y && \
  apt-get install tzdata -y
vim인코딩을 설정한다.
echo "set encoding=utf-8" >> /etc/vim/vimrc && \
  echo "set fileencodings=utf-8,cp949" >> /etc/vim/vimrc
- Anaconda를 다운로드한 후 설치한다.
curl -O https://repo.anaconda.com/archive/Anaconda3-2021.05-Linux-x86_64.sh && \
  bash Anaconda3-2021.05-Linux-x86_64.sh
- 다운로드한 Anaconda 설치용 스크립트를 삭제한다.
- Anaconda 환경변수를 초기화한다.
active environment : base
    active env location : /root/anaconda3
            shell level : 1
       user config file : /root/.condarc
 populated config files :
          conda version : 4.10.1
    conda-build version : 3.21.4
         python version : 3.8.8.final.0
       virtual packages : __linux=4.15.0=0
                          __glibc=2.31=0
                          __unix=0=0
                          __archspec=1=x86_64
       base environment : /root/anaconda3  (writable)
      conda av data dir : /root/anaconda3/etc/conda
  conda av metadata url : https://repo.anaconda.com/pkgs/main
           channel URLs : https://repo.anaconda.com/pkgs/main/linux-64
                          https://repo.anaconda.com/pkgs/main/noarch
                          https://repo.anaconda.com/pkgs/r/linux-64
                          https://repo.anaconda.com/pkgs/r/noarch
          package cache : /root/anaconda3/pkgs
                          /root/.conda/pkgs
       envs directories : /root/anaconda3/envs
                          /root/.conda/envs
               platform : linux-64
             user-agent : conda/4.10.1 requests/2.25.1 CPython/3.8.8 Linux/4.15.0-72-generic ubuntu/20.04.2 glibc/2.31
                UID:GID : 0:0
             netrc file : None
           offline mode : False
ctrl + p + q로 컨테이너 밖으로 나간 후 다음과 같이 커밋한다.
- 이미지가 커밋되었는지 확인한다.
- Docker에 로그인을 한 후 User Id 변수를 지정하는데, 이때 User Id 변수는 Docker 로그인을 할 때 썼던 계정 이름이다.
- 이미지에 태그를 달아준다.
- 태그가 적용되어 있는 이미지를 Docker Hub에 푸시한다.
- RTX2080TI 서버에서 Client를 구축할 때 지금 푸시한 이미지를 이용하면 된다.
- 이제 다시 Docker Compose에서 Classifier Server를 구성하기 위한 단계로 돌아가는데, 먼저 Python 스크립트부터 작성한다.
- 다음은 FastAPI를 사용할 때의 코드이다.
./classifier/classifier.py
from fastapi import FastAPI, Body, Header, HTTPException, status
from fastapi.responses import JSONResponse
from fastapi.exceptions import RequestValidationError
from fastapi.encoders import jsonable_encoder
from pydantic import BaseModel, Field
from opencc import OpenCC
import starlette
import logging
import redis
import pymongo
import hashlib
import aiohttp
import json
import os

class Classifier:
    def __init__(self):
        self.project_dir = os.path.dirname(os.path.abspath(__file__))
        self.json_name = "api_token.json"
        self.json_path = os.path.join(self.project_dir, self.json_name)
        self.PID = os.getpid()
        logging.info(f"PID: {self.PID} / Loaded Classifier")

        if not os.path.isfile(self.json_path):
            logging.error(f"PID: {self.PID} / {self.json_path} does not exist!")

        self.load()

    def load(self):
        with open(self.json_path, "r") as json_file:
            self.json_data = json.load(json_file)

        logging.info(f"PID: {self.PID} / JSON file loaded from {self.json_path}")

class Data(BaseModel):
    src_lang: str = Field(..., min_length=2, max_length=5)
    src_text: str = Field(..., min_length=1)
    tgt_lang: str = Field(..., min_length=2, max_length=5)

app = FastAPI()
logging.basicConfig(filename="./log.log", level=logging.DEBUG)
inference_url = os.environ["INFERENCE_URL"]

@app.on_event("startup")
async def startup_event():
    app.session = aiohttp.ClientSession()
    app.classifier = Classifier()
    app.api_tokens = app.classifier.json_data.values()
    app.redis_data = redis.StrictRedis(host="nmt_cache", port=6379, db=0)
    app.redis_count = redis.StrictRedis(host="nmt_cache", port=6379, db=1)
    app.mongo = pymongo.MongoClient(host="nmt_db", port=27017)["nmt_db"]["nmt_collection"]
    app.langs = ["ko", "en", "zh-cn", "zh-tw", "es", "fr", "ru", "id", "ja", "vi", "de", "it", "hi", "ar", "pt", "tl"]
    app.cc_t2s = OpenCC("t2s")
    app.cc_s2tw = OpenCC("s2tw")

@app.on_event("shutdown")
async def shutdown_event():
    await app.session.close()

@app.exception_handler(RequestValidationError)
async def validation_exception_handler(
    request: starlette.requests.Request, exc: RequestValidationError
) -> JSONResponse:
    logging.info(f"Invalid Body: {str(exc)}")

    return JSONResponse({"detail": str(exc)}, status_code=status.HTTP_400_BAD_REQUEST)

@app.post("/", status_code=status.HTTP_200_OK)
async def main(*, data: Data = Body(...), authorization=Header(...)) -> JSONResponse:
    if authorization not in app.api_tokens:
        logging.error(f"{app.classifier.PID}: Invalid API Token - {authorization}")

        raise HTTPException(
            status_code=status.HTTP_401_UNAUTHORIZED, detail="Invalid API Token"
        )

    body = jsonable_encoder(data)
    src_lang = body["src_lang"]
    src_text = body["src_text"]
    tgt_lang = body["tgt_lang"]

    if src_lang not in app.langs:
        logging.error(f"{app.classifier.PID}: Invalid Src_Lang - {src_lang}")

        raise HTTPException(
            status_code=status.HTTP_400_BAD_REQUEST, detail="Invalid Src_Lang"
        )

    if tgt_lang not in app.langs:
        logging.error(f"{app.classifier.PID}: Invalid Tgt_Lang - {tgt_lang}")

        raise HTTPException(
            status_code=status.HTTP_400_BAD_REQUEST, detail="Invalid Tgt_Lang"
        )

    h = hashlib.new("sha256")
    h.update(src_lang.encode("utf-8"))
    h.update(src_text.encode("utf-8"))
    h.update(tgt_lang.encode("utf-8"))
    hashed_key = h.hexdigest()

    check_redis = app.redis_data.get(hashed_key)

    if check_redis is not None:
        tgt_text = dict(json.loads(check_redis.decode("utf-8")))["tgt_text"]
        count = int(app.redis_count.incr(hashed_key, 1))

        logging.info(
            f"PID: {app.classifier.PID}\n     Src_Lang: {src_lang} / Src_Text: {src_text}\n     Tgt_Lang: {tgt_lang} / Tgt_Text: {tgt_text}\n     Get from Cache - {count} Time(s)"
        )
    else:
        URL = inference_url + tgt_lang

        async with app.session.post(URL, json={"src_lang": src_lang, "src_text": app.cc_t2s.convert(src_text) if src_lang == "zh-cn" or src_lang == "zh-tw" else src_text, "tgt_lang": tgt_lang}) as response:
            response_data = await response.read()
        tgt_text = json.loads(response_data)["tgt_text"]
        tgt_text = app.cc_s2tw.convert(tgt_text) if tgt_lang == "zh-tw" else tgt_text

        if not tgt_text:
            logging.error(f"{app.classifier.PID}: Translation failed")

            raise HTTPException(
                status_code=status.HTTP_500_INTERNAL_SERVER_ERROR, detail="Translation failed"
            )

        data_dict = {
            "src_lang": src_lang,
            "src_text": src_text,
            "tgt_lang": tgt_lang,
            "tgt_text": tgt_text,
        }
        dict_value = json.dumps(data_dict, ensure_ascii=False).encode("utf-8")

        app.redis_data.set(hashed_key, dict_value)
        app.redis_count.set(hashed_key, 0)
        app.mongo.insert_one(data_dict)

        logging.info(
            f"PID: {app.classifier.PID}\n     Src_Lang: {src_lang} / Src_Text: {src_text}\n     Tgt_Lang: {tgt_lang} / Tgt_Text: {tgt_text}\n     Set to Cache/DB"
        )

    body.update({"tgt_text": tgt_text})

    return JSONResponse(content=jsonable_encoder(body))
- 다음은 Flask를 사용할 때의 코드이다.
./classifier/classifier.py
from flask import Flask, request
from opencc import OpenCC
import redis
import pymongo
import hashlib
import requests
import logging
import json
import os

class Classifier:
    def __init__(self):
        self.project_dir = os.path.dirname(os.path.abspath(__file__))
        self.json_name = "api_token.json"
        self.json_path = os.path.join(self.project_dir, self.json_name)
        self.PID = os.getpid()
        logging.info(f"PID: {self.PID} / Loaded Classifier!")

        if not os.path.isfile(self.json_path):
            logging.error(f"PID: {self.PID} / {self.json_path} does not exist!")

        self.load()

    def load(self):
        with open(self.json_path, "r") as json_file:
            self.json_data = json.load(json_file)

        logging.info(f"PID: {self.PID} / JSON file loaded from {self.json_path}")

def request_text(URL: str, body: dict):
    src_lang = body["src_lang"]
    src_text = body["src_text"]
    tgt_lang = body["tgt_lang"]

    response = requests.post(URL, data=json.dumps({"src_lang": src_lang, "src_text": cc_t2s.convert(src_text) if src_lang == "zh-cn" or src_lang == "zh-tw" else src_text, tgt_lang})).json()

    return response

app = Flask(__name__)
logging.basicConfig(filename="./log.log", level=logging.DEBUG)
inference_url = os.environ["INFERENCE_URL"]
classifier = Classifier()
api_tokens = classifier.json_data.values()
redis_data = redis.StrictRedis(host="nmt_cache", port=6379, db=0)
redis_count = redis.StrictRedis(host="nmt_cache", port=6379, db=1)
mongo = pymongo.MongoClient(host="nmt_db", port=27017)["nmt_db"]["nmt_collection"]
cc_t2s = OpenCC("t2s")
cc_s2tw = OpenCC("s2tw")

@app.route("/", methods=["POST"])
def main():
    headers = request.headers
    body = request.get_json(force=True)

    if headers["Authorization"] in api_tokens:
        src_lang = body["src_lang"]
        src_text = body["src_text"]
        tgt_lang = body["tgt_lang"]

        h = hashlib.new("sha256")
        h.update(src_lang.encode("utf-8"))
        h.update(src_text.encode("utf-8"))
        h.update(tgt_lang.encode("utf-8"))
        hashed_key = h.hexdigest()

        check_redis = redis_data.get(hashed_key)

        if check_redis is not None:
            tgt_text = dict(json.loads(check_redis.decode("utf-8")))["tgt_text"]
            count = int(redis_count.incr(hashed_key, 1))

            logging.info(f"PID: {classifier.PID}\n     Src_Lang: {src_lang} / Src_Text: {src_text}\n     Tgt_Lang: {tgt_lang} / Tgt_Text: {tgt_text}\n     Get from Cache - {count} Times")
        else:
            URL = inference_url + tgt_lang

            tgt_text = request_text(URL, body)["tgt_text"]
            tgt_text = cc_s2tw.convert(tgt_text) if tgt_lang == "zh-tw" else tgt_text
            data_dict = {
                    "src_lang": src_lang,
                    "src_text": src_text,
                    "tgt_lang": tgt_lang,
                    "tgt_text": tgt_text
                    }
            dict_value = json.dumps(data_dict, ensure_ascii=False).encode("utf-8")

            redis_data.set(hashed_key, dict_value)
            redis_count.set(hashed_key, 0)
            mongo.insert_one(data_dict)

            logging.info(f"PID: {classifier.PID}\n     Src_Lang: {src_lang} / Src_Text: {src_Text}\n     Tgt_Lang: {tgt_lang} / Tgt_Text: {tgt_text}\n     Set to Cache/DB")

        body.update({"tgt_text": tgt_text})

        return body
    else:
        logging.error(f"API Token Error!")

        return "API Token Error!"

if __name__ == "__main__":
    app.run(host="0.0.0.0", port="80", debug=True)
- API Token을 요구해야 하기 때문에 API Token을 관리할 수 있는 API Token Manager를 작성한다.
./classifier/api_token_manager.py
import os
import json
import random
import bcrypt

class ApiTokenManager:
    def __init__(self):
        self.project_dir = os.path.dirname(os.path.realpath(__file__))
        self.json_name = "api_token.json"
        self.json_path = os.path.abspath(os.path.join(self.project_dir, self.json_name))

        if not os.path.isfile(self.json_path):
            self.json_data = {}
            self.save()

        self .load()

    def save(self):
        with open(self.json_path, "w") as json_file:
            json.dump(self.json_data, json_file)

        print(f"JSON file saved to {self.json_path}")

    def load(self):
        with open(self.json_path, "r") as json_file:
            self.json_data = json.load(json_file)

        print(f"JSON file loaded from {self.json_path}")

    def generate_token(self, client_name: str):
        password = str(random.SystemRandom(7)) + client_name
        api_token = bcrypt.hashpw(password.encode("utf-8"), bcrypt.gensalt()).decode("utf-8")

        print(f"Client Name {client_name} / API Token {api_token} has generated!")

        return api_token

    def create(self, client_name: str):
        if client_name in self.json_data.keys():
            print(f"Client Name {client_name} already exists!")
        else:
            self.json_data[client_name] = self.generate_token(client_name)

    def read(self, option: str):
        if option == "all":
            print(self.json_data)
        else:
            if option in self.json_data.keys():
                print(self.json_data[option])
            else:
                print("Enter Valid Client Name!")

    def update(self, client_name: str):
        if client_name in self.json_data.keys():
            option = input("Enter Update Option\n ---> (Name / Token)").lower()

            if option == "name":
                new_client_name = input("Enter New Client Name\n ---> (STRING)").lower()
                if new_client_name in self.json_data.keys():
                    print(f"Client Name {new_client_name} already exists!")
                else:
                    self.json_data[new_client_name] = self.json_data.pop(client_name)
                    print(f"Client Name {client_name} has changed to {new_client_name}")
            elif option == "token":
                self.json_data[client_name] = self.generate_token(client_name)
            else:
                print("Enter Valid Option!")
        else:
            print("Enter Valid Client Name!")

    def delete(self, client_name: str):
        if client_name in self.json_data.keys():
            check = input("Delete Client?\n ---> (YES / NO)").lower()

            if check == "yes":
                del self.json_data[client_name]
                print("Client Name {client_name} has been deleted!")
            else:
                print("Nothing Done")
        else:
            print("Enter Valid Client Name!")

if __name__ == "__main__":
    atm = ApiTokenManager()

    while True:
        command = input("1. Create (C)\n2. Read (R)\n3. Update (U)\n4. Delete (D)\n5. Save (S)\n6. Init (I)\n7. Exit (E)\n ---> (COMMAND)").lower()

        if command == "c":
            client_name = input("Enter Client Name\n ---> (STRING)").lower()
            atm.create(client_name)
        elif command == "r":
            option = input("Enter Read Option\n ---> (ALL / Client Name)").lower()
            atm.read(option)
        elif command == "u":
            client_name = input("Enter Client Name\n ---> (STRING)").lower()
            atm.update(client_name)
        elif command == "d":
            client_name = input("Enter Client Name\n ---> (STRING)").lower()
            atm.delete(client_name)
        elif command == "s":
            atm.save()
        elif command == "i":
            atm.load()
        elif command == "e":
            print("Bye Bye")
            break
        else:
            print("Enter Valid Command!")
- 그리고 미리 만들어 둔 VoicePrint의 API Token을 생성한다.
./classifier/api_token.json
{ "voiceprint": "$2b$12$sUlMELV0B9Uj.UyvaE5Yq.c6um9hcLqdfWQTy1sNiirVCQZ8sI2ZG" }
- Gunicorn을 사용하기 위한 설정 파일을 작성한다.
- 다음은 FastAPI를 사용할 때의 코드이다.
./classifier/gunicorn.conf.py
import multiprocessing

# Python Module:Variable
wsgi_app = "classifier:app"

# Host:Port
bind = "172.18.1.6:8888"

# Worker Class == Default: "sync"
worker_class = "uvicorn.workers.UvicornWorker"

# Num of Workers
#workers = int(multiprocessing.cpu_count() * 0.1)
workers = 1

# Timeout == 0(Deactivate)
timeout = 0
- 다음은 Flask를 사용할 때의 코드이다.
./classifier/gunicorn.conf.py
import multiprocessing

# Python Module:Variable
wsgi_app = "classifier:app"

# Host:Port
bind = "172.18.1.6:8888"

# Worker Class == Default: "sync"
worker_class = "gevent"

# Num of Workers
# workers = int(multiprocessing.cpu_count() * 0.1)
workers = 1

# Num of Worker Connections
worker_connections = 1024

# Timeout == 0(Deactivate)
timeout = 0
- 이제 다른 설정 파일, Python Dependencies 설치도 고려하여
Dockerfile을 작성한다. - 다음은 FastAPI를 사용할 때의 코드이다.
./classifier/Dockerfile
FROM saemc27/anaconda-dev:1.0

ENV PATH /root/anaconda3/bin:$PATH

RUN /bin/bash -c "source ~/.bashrc"
RUN conda update conda -y

RUN pip install redis pymongo
RUN pip install gunicorn uvicorn[standard] fastapi[all] aiohttp
RUN pip install bcrypt opencc
- 다음은 Flask를 사용할 때의 코드이다.
./classifier/Dockerfile
FROM saemc27/anaconda-dev:1.0

ENV PATH /root/anaconda3/bin:$PATH

RUN /bin/bash -c "source ~/.bashrc"
RUN conda update conda -y

RUN pip install redis pymongo
RUN pip install gunicorn flask gevent
RUN pip install bcrypt requests opencc
- 현재 디렉터리 및 파일 구조는 다음과 같다.
docker_compose
├── cache
│   ├── data
│   └── redis.conf
├── classifier
│   ├── api_token.json
│   ├── api_token_manager.py
│   ├── classifier.py
│   ├── Dockerfile
│   └── gunicorn.conf.py
├── db
│   └── data
├── docker-compose.yml
├── inference
│   ├── conda_init.txt
│   ├── config.properties
│   ├── Dockerfile
│   ├── handler.py
│   ├── torchserve.sh
│   └── voiceprint
│       └── m2m100_418M
│           ├── config.json
│           ├── pytorch_model.bin
│           ├── sentencepiece.bpe.model
│           ├── setup_config.json
│           ├── special_tokens_map.json
│           ├── tokenizer_config.json
│           └── vocab.json
└── proxy
    └── nginx.conf

9 directories, 20 files
7) docker-compose.yml 마무리 작성
docker-compose.yml파일을 수정한다.- 이때 Proxy Server만 외부 포트가 필요하므로 나머지는
ports옵션 대신expose옵션으로 설정한다. - 만약
docker-compose.yml파일을 작성하면서 진행할 때 컨테이너가 꺼지지 않도록 하려면entrypoint: [”tail”, “-f”, “/dev/null”]을 설정한다.
./docker-compose.yml
version: "3.8"

services:
  nmt_proxy:
    container_name: "nmt_proxy"
    image: nginx:latest
    restart: always
    ports:
      - "9003:80"
    working_dir: /
    volumes:
      - ./proxy/nginx.conf:/etc/nginx/nginx.conf
    networks:
      net:
        ipv4_address: 172.18.1.2

  nmt_cache:
    container_name: "nmt_cache"
    image: redis:latest
    restart: always
    expose:
      - "6379"
    depends_on:
      - nmt_proxy
    working_dir: /
    volumes:
      - ./cache/data:/data
      - ./cache/redis.conf:/usr/local/etc/redis/redis.conf
    networks:
      net:
        ipv4_address: 172.18.1.3
    entrypoint: ["redis-server", "/usr/local/etc/redis/redis.conf"]

  nmt_db:
    container_name: "nmt_db"
    image: mongo:latest
    restart: always
    expose:
      - "27017"
    depends_on:
      - nmt_proxy
    working_dir: /
    volumes:
      - ./db/data:/data/db
    networks:
      net:
        ipv4_address: 172.18.1.4

  nmt_inference:
    container_name: "nmt_inference"
    build:
      context: .
      dockerfile: ./inference/Dockerfile
    restart: always
    expose:
      - "9999"
    depends_on:
      - nmt_proxy
    working_dir: /inference
    volumes:
      - ./inference/config.properties:/inference/config.properties
      - ./inference/handler.py:/inference/handler.py
      - ./inference/torchserve.sh:/inference/torchserve.sh
      - ./inference/voiceprint:/inference/voiceprint
    deploy:
      resources:
        reservations:
          devices:
            - capabilities: [gpu]
    networks:
      net:
        ipv4_address: 172.18.1.5
    entrypoint: ["/bin/bash", "torchserve.sh"]

  nmt_classifier:
    container_name: "nmt_classifier"
    build:
      context: .
      dockerfile: ./classifier/Dockerfile
    restart: always
    expose:
      - "8888"
    depends_on:
      - nmt_proxy
    environment:
      - INFERENCE_URL=http://172.18.1.5:9999/predictions/
    working_dir: /classifier
    volumes:
      - ./classifier/api_token.json:/classifier/api_token.json
      - ./classifier/api_token_manager.py:/classifier/api_token_manager.py
      - ./classifier/classifier.py:/classifier/classifier.py
      - ./classifier/gunicorn.conf.py:/classifier/gunicorn.conf.py
    networks:
      net:
        ipv4_address: 172.18.1.6
    entrypoint: ["gunicorn"]

networks:
  net:
    ipam:
      driver: default
      config:
        - subnet: "172.18.1.0/16"
8) Docker Compose 실행하기
docker-compose파일을 다 작성했으면 이제 실행한다.
- Docker Compose는 다음과 같이 중단할 수 있다.
- 또한, 다음과 같이 해당 컨테이너의 네트워크를 확인할 수 있다.
- 또는 Docker의 모든 네트워크를 확인할 수도 있다.
- Docker Compose로 구성한 네트워크를 삭제하려면 다음과 같이 해결할 수 있다.
5. RTX2080TI 서버
saemc27/anaconda-dev:1.0이미지로 컨테이너를 다시 만들어서 구축 작업을 진행하는데, 먼저 이미지를 가져온다.
9003번 포트로 지정하여 컨테이너를 생성한다.
- Python Dependencies를 설치한다.
$(base) conda update conda -y && \
        conda install pytorch torchvision torchaudio torchtext cpuonly -c pytorch -y && \
        pip install streamlit
- Streamlit 코드를 작성한다.
./NMT.py
import json, time
import requests
import streamlit as st
import pandas as pd
from multiprocessing import Process, Queue
from torchtext.data import get_tokenizer
from torchtext.data.metrics import bleu_score

def request_text(idx: int, GMT: str, URL: str, API_TOKEN: str, src_lang: str, src_text: str, tgt_lang: str, result_queue: Queue):
    headers = {"Authorization": API_TOKEN}
    body = {"src_lang": src_lang, "src_text": src_text, "tgt_lang": tgt_lang}
    response = requests.post(URL, data=json.dumps(body), headers=headers)
    tgt_text = response.json()["tgt_text"]

    print(f"\nIndex: {idx} / GMT: {GMT}\nSrc_Lang: {src_lang} / Src_Text: {src_text}\nTgt_Lang: {tgt_lang} / Tgt_Text: {tgt_text}\n")

    result_queue.put((idx, tgt_text))

def main():
    # st.set_page_config(layout="wide")
    URL = "http://14.49.45.62:9003"
    API_TOKEN = "$2b$12$sUlMELV0B9Uj.UyvaE5Yq.c6um9hcLqdfWQTy1sNiirVCQZ8sI2ZG"

    lang_codes = {
        "Korean": "ko",
        "English": "en",
        "Chinese-CN": "zh-cn",
        "Chinese-TW": "zh-tw",
        "Spanish": "es",
        "French": "fr",
        "Rusian": "ru",
        "Indonesian": "id",
        "Japanese": "ja",
        "Vietnamese": "vi",
        "German": "de",
        "Italian": "it",
        "Hindi": "hi",
        "Arabic": "ar",
        "Portuguese": "pt",
        "Tagalog": "tl"
    }

    st.title("Many to Many Translator")
    language_option = st.selectbox("Choose a Source Language", list(lang_codes.keys()))

    if language_option:
        src_text = st.text_area(
            "Enter text", value="", height=None, max_chars=None, key=None
        )
        ref_text = ""

        if language_option == "Korean" or language_option == "English":
            bleu_button = st.checkbox("Check BLEU Score")

            if bleu_button:
                ref_text = st.text_area("Enter reference:", value="", height=None, max_chars=None, key=None)

        col1, col2, col3, col4, col5 = st.columns(5)

        if col5.button("Translate text"):
            if src_text == "":
                st.write("Please enter text for tanslation")
            else:
                with st.spinner("Running translation..."):
                    start = time.time()

                    src_lang = lang_codes.pop(language_option)
                    GMT = time.ctime(time.time())
                    print(f"GMT: {GMT}\nSource Language: {language_option}\n")

                    result_queue = Queue()
                    idx_list, translated_list, bleu_list = [], [], []
                    procs = []

                    procs = [Process(target=request_text, args=(idx, GMT, URL, API_TOKEN, src_lang, src_text, lang_code, result_queue)) for idx, (lang, lang_code) in enumerate(lang_codes.items())]

                    for proc in procs:
                        proc.start()

                    for proc in procs:
                        proc.join()

                    while not result_queue.empty():
                        idx, translated = result_queue.get()
                        idx_list.append(idx)
                        translated_list.append(translated)

                    translated_list = list(pd.DataFrame({"idx": idx_list, "Translated": translated_list}).sort_values(by=["idx"], axis=0)["Translated"])

                    if len(ref_text) > 0:
                        tokenizer = get_tokenizer("basic_english")
                        reference_corpus = [[tokenizer(ref_text)]]
                        translated_corpus = [tokenizer(translated_list[0])]

                        bleu_list.append(str(bleu_score(translated_corpus, reference_corpus, max_n=1, weights=[1.0])))

                        for _ in range(len(lang_codes.keys()) - 1):
                            bleu_list.append("")

                        print(translated_list)

                        df = pd.DataFrame({"Language": list(lang_codes.keys()), "Translated Text": translated_list, "BLEU Score": bleu_list})
                    else:
                        print(translated_list)

                        df = pd.DataFrame({"Language": list(lang_codes.keys()), "Translated Text": translated_list})

                    st.table(df)

                    end = time.time()

                    col1, col2, col3, col4, col5 = st.columns(5)
                    col5.write(f"{end - start:.5f} sec.")

if __name__ == "__main__":
    main()
- Streamlit 코드를 실행한다.
You can now view your Streamlit app in your browser.

  Network URL: http://172.17.0.3:9003
  External URL: http://14.138.218.153:9003