8. 서버에서 데이터 받아오기
이번 튜토리얼에서는 Angular가 제공하는 HttpClient를 사용해서 데이터를 처리하는 기능에 대해 알아본다.
HeroService가 히어로 데이터를 가져올 때 HTTP 요청을 통해 가져올 것이다.- 사용자가 추가, 변경, 삭제한 히어로 데이터는 HTTP 요청을 보내서 서버에 저장할 것이다.
- 사용자가 히어로의 이름으로 검색할 수 있는 기능을 만들어 본다.
1. HTTP 서비스 추가하기
HttpClient는 리모트 서버와 HTTP 통신을 하기 위해 Angular가 제공하는 서비스이다. 애플리케이션 전역 범위에서 HttpClient를 사용하려면 다음과 같이 설정한다:
import { HttpClientModule } from "@angular/common/http";
그리고 AppModule의 imports 배열에 HttpClientModule을 추가한다.
2. 데이터 서버 목킹하기
이번 예제에서는 인-메모리(in-memory) Web API 모듈로 리모트 데이터 서버와 통신하는 부분을 대신한다.
이 모듈을 설치하고나면 HttpClient로 보내는 요청이나 받는 요청이 인-메모리 Web API로 처리되며, 데이터가 저장되고 반환하는 것도 이 모듈을 활용한다.
인-메모리 Web API를 사용하면 HttpClient와 통신할 서버를 준비하지 않아도 된다.
다음 명령을 실행해서 npm 저장소에 있는 인-메모리 Web API 패키지를 설치한다:
AppModule에서 HttpClientInMemoryWebApiModule과 InMemoryDataService 클래스를 로드한다.
import { HttpClientInMemoryWebApiModule } from "angular-in-memory-web-api";
import { InMemoryDataService } from "./in-memory-data.service";
AppModule의 imports 배열 HttpClientModule 뒤에 HttpClientInMemoryWebApiModule을 추가하고 InMemoryDataService를 사용할 수 있도록 다음과 같이 작성한다.
HttpClientModule,
  // HttpClientInMemoryWebApiModule 모듈은 HTTP 요청을 가로채고 서버의 응답을 흉내냅니다.
  // 실제 서버가 준비되면 이 부분을 제거하면 됩니다.
  HttpClientInMemoryWebApiModule.forRoot(InMemoryDataService, {
    dataEncapsulation: false,
  });
forRoot() 메서드는 InMemoryDataService 클래스를 인자로 받아서 인-메모리 데이터베이스의 실행환경을 구성하는 메서드이다.
다음 명령을 실행해서 src/app/in-memory-data.service.ts 클래스를 생성한다:
그리고 이 파일의 내용을 다음과 같이 수정한다:
import { Injectable } from "@angular/core";
import { InMemoryDbService } from "angular-in-memory-web-api";
import { Hero } from "./hero";

@Injectable({
  providedIn: "root",
})
export class InMemoryDataService implements InMemoryDbService {
  createDb() {
    const heroes = [
      { id: 11, name: "Dr Nice" },
      { id: 12, name: "Narco" },
      { id: 13, name: "Bombasto" },
      { id: 14, name: "Celeritas" },
      { id: 15, name: "Magneta" },
      { id: 16, name: "RubberMan" },
      { id: 17, name: "Dynama" },
      { id: 18, name: "Dr IQ" },
      { id: 19, name: "Magma" },
      { id: 20, name: "Tornado" },
    ];
    return { heroes };
  }

  // 히어로 객체가 항상 id 프로퍼티를 갖도록 getId 메소드를 오버라이드 합니다.
  // 히어로 목록이 비어있다면 이 메소드는 초기값(11)을 반환합니다.
  // 히어로 목록이 비어있지 않으면 히어로 id의 최대값에 1을 더해서 반환합니다.
  genId(heroes: Hero[]): number {
    return heroes.length > 0
      ? Math.max(...heroes.map((hero) => hero.id)) + 1
      : 11;
  }
}
in-memory-data.service.ts 파일은 mock-heroes.ts의 기능을 대신한다. 하지만 이 튜토리얼의 몇 단계를 더 진행하는 데 여전히 필요하므로 아직 mock-heroes.ts를 삭제하지 않는다.
나중에 서버가 준비되면 인-메모리 Web API를 제거하기만 하면 클라이언트가 보내는 요청이 서버에서 이전과 같이 처리될 것이다.
3. 히어로 데이터와 HTTP
HeroService에서 HttpClient 심볼과 HttpHeaders 심볼을 로드한다:
import { HttpClient, HttpHeaders } from "@angular/common/http";
그리고 HeroService의 생성자에서 HttpClient를 http 프로퍼티로 주입한다.
constructor(
  private http: HttpClient,
  private messageService: MessageService) { }
MessageService는 의존성으로 주입되지만, 이 서비스는 가끔 사용하기 때문에 private log() 메서드로 랩핑한다.
/** HeroService에서 보내는 메시지는 MessageService가 화면에 표시합니다. */
private log(message: string) {
  this.messageService.add(`HeroService: ${message}`);
}
heroesUrl을 :base/:collectionName과 같은 형태로 정의한다. 이 주소는 서버의 리소스 위치에 따라 달라질 수 있다. 이 주소에서 base는 어떤 종류의 요청인지 구별하는 변수이며, collectionName은 in-memory-data.service.ts 파일에 있는 콜렉션을 구별하는 변수이다.
1) HttpClient로 히어로 목록 가져오기
지금까지 HeroService.getHeroes() 메서드는 히어로 목록 목 데이터를 Observable<Hero[]> 타입으로 반환하기 위해 RxJS of() 함수를 사용했다.
getHeroes(): Observable<Hero[]> {
  const heroes = of(HEROES);
  return heroes;
}
이 메서드가 HttpClient로 동작하도록 다음과 같이 수정한다:
/** GET: 서버에서 히어로 목록 가져오기 */
getHeroes(): Observable<Hero[]> {
  return this.http.get<Hero[]>(this.heroesUrl)
}
브라우저가 갱신되면 이제 히어로 데이터는 목 서버에서 받아온다.
of 함수를 http.get으로 변경했지만 이 서비스 외의 다른 부분은 변경하지 않아도 된다. 두 함수는 모두 Observable<Hero[]> 타입을 반환한다.
2) HttpClient 메서드는 데이터를 하나만 반환한다
HttpClient가 제공하는 메서드는 모두 RxJS Observable 타입을 한 번만 반환한다.
HTTP는 요청과 응답으로 구성되는 프로토콜이다. 그래서 요청이 한 번 있으면 응답도 한 번이다.
일반적으로 옵저버블은 여러 번에 걸쳐 여러 데이터를 반환할 수 있다. 하지만 HttpClient가 반환하는 옵저버블은 데이터를 한 번만 반환하고 종료되며, 다시 사용되지 않는다.
예제에서 사용한 HttpClient.get()도 Observable<Hero[]> 데이터를 한 번만 반환한다.
3) HttpClient.get 함수는 응답으로 받은 데이터를 반환한다
HttpClient.get 함수는 HTTP 응답으로 받은 몸체(body)를 반환하는데, 이 객체는 타입이 지정되지 않은 JSON 객체로 처리된다. 그래서 이 객체에 타입을 지정하려면 <Hero[]>와 같이 제네릭을 지정하면 된다.
JSON 데이터의 형식은 서버에 정의된 데이터 API에 따라 달라진다. 히어로들의 여행에서 사용하는 데이터 API는 모두 히어로 데이터를 배열로 반환한다.
Note
- 데이터는 HTTP 응답으로 받은 객체 안에 깊숙히 들어있을 수도 있다.
- 이런 경우에는 원하는 데이터를 추출하기 위해 RxJS
map연산자를 사용해야 한다. - 이 내용은 이 문서에서 다루지 않지만 예제 코드에 구현된
getHeroNo404()메서드를 보면map연산자를 사용하는 코드를 확인할 수 있다.
4) 에러 처리하기
리모트 서버에서 데이터를 가져오는 과정은 얼마든지 잘못될 수 있다. 그래서 HeroService.getHeroes() 메서드에는 에러가 발생했을 때 처리하는 로직이 필요하다.
에러를 처리하려면 http.get()으로 받은 옵저버블에 "pipe"를 사용해서 catchError() 연산자를 연결하면 된다.
rxjs/operators에서 catchError 심볼을 로드한다. 이 때 앞으로 사용할 연산자 몇 개도 함께 로드했다.
이제 옵저버블로 받은 데이터를 pipe() 메서드로 확장하고 이 파이프에 catchError() 연산자를 연결한다.
getHeroes(): Observable<Hero[]> {
  return this.http.get<Hero[]>(this.heroesUrl)
    .pipe(
      catchError(this.handleError<Hero[]>('getHeroes', []))
    );
}
catchError() 연산자는 Observable이 실패했을 때 실행되는 연산자이다. 이 연산자에는 에러가 발생했을 때 실행할 에러 핸들러 함수를 인자로 전달한다.
다음 섹션에서 구현할 handleError() 메서드는 에러를 콘솔에 출력한 뒤에 빈 배열을 반환한다. 그래서 서버에 보낸 요청이 실패하는 에러가 발생하더라도 애플리케이션은 계속 동작할 수 있다.
handleError
HeroService의 메서드들은 에러 처리로직이 비슷하기 때문에 handleError() 메서드에 이 로직을 정의한다.
이렇게 구현하면 각 메서드에서 에러를 직접 처리하는 대신 catchError에 이 핸들러 함수의 반환값을 처리하기 때문에, 옵저버블이 처리되는 도중 데이터가 잘못되어 발생하는 오류를 방지할 수 있다.
/**
 * HTTP 요청이 실패한 경우를 처리합니다.
 * 애플리케이션 로직 흐름은 그대로 유지됩니다.
 * @param operation - 실패한 동작의 이름
 * @param result - 기본값으로 반환할 객체
 */
private handleError<T>(operation = 'operation', result?: T) {
  return (error: any): Observable<T> => {

    // TODO: 리모트 서버로 에러 메시지 보내기
    console.error(error); // 지금은 콘솔에 로그를 출력합니다.

    // TODO: 사용자가 이해할 수 있는 형태로 변환하기
    this.log(`${operation} failed: ${error.message}`);

    // 애플리케이션 로직이 끊기지 않도록 기본값으로 받은 객체를 반환합니다.
    return of(result as T);
  };
}
에러를 콘솔에 출력하고나면 핸들러 함수는 사용자가 이해하기 쉬운 형식의 메시지를 반환하면서 앱이 중단되지 않도록 기본값을 반환한다.
이 때 서비스의 각 메서드는 서로 다른 타입으로 Observable 결과를 반환하기 때문에 handlerError() 메서드는 각 메서드의 기본값을 인자로 받을 수 있도록 정의했다.
5) Observable 확인하기
HeroService에 정의하는 메서드는 옵저버블 데이터를 살짝 참조해서(tap) log() 함수로 메시지를 화면에 출력한다.
옵저버블 데이터를 확인하려면 RxJS가 제공하는 tap 연산자를 사용하면 된다. 이 연산자는 옵저버블 데이터를 사용해서 어떤 동작을 수행하는데, 옵저버블 데이터는 변경하지 않고 그대로 전달한다.
getHeroes() 메서드에 tap을 활용하는 로직을 넣으면 다음과 같이 구현할 수 있다.
/** GET: 서버에서 히어로 목록 가져오기 */
getHeroes(): Observable<Hero[]> {
  return this.http.get<Hero[]>(this.heroesUrl)
    .pipe(
      tap(_ => this.log('fetched heroes')),
      catchError(this.handleError<Hero[]>('getHeroes', []))
    );
}
6) id로 히어로 데이터 가져오기
일반적으로 웹 API는 id로 데이터를 검색하는 기능을 :baseURL/:id와 같은 방식으로 제공한다.
이번에는 히어로 데이터와 HTTP 섹션에서 정의한 heroesURL에 기본 URL과 히어로 id에 해당하는 숫자를 사용해서 api/heroes/11라는 주소로 히어로 데이터를 요청해 보자.
HeroService의 getHero() 메서드를 다음과 같이 수정한다:
/** GET: id에 해당하는 히어로 데이터 가져오기. 존재하지 않으면 404를 반환합니다. */
getHero(id: number): Observable<Hero> {
  const url = `${this.heroesUrl}/${id}`;
  return this.http.get<Hero>(url).pipe(
    tap(_ => this.log(`fetched hero id=${id}`)),
    catchError(this.handleError<Hero>(`getHero id=${id}`))
  );
}
이 메서드는 getHeroes와 다른 점이 3가지 있다.
- 인자로 받은 히어로
id로 URL을 구성한다. - 서버가 반환하는 응답은 배열 형태의 히어로 목록이 아니라 히어로 한 명의 데이터이다.
- 그래서
getHero가 반환하는 결과물은Observable<Hero>타입으로 "히어로 객체를 표현하는 옵저버블"이다.
4. 히어로 데이터 수정하기
히어로 상세정보 화면에서는 히어로의 이름을 수정할 수 있다. 그런데 사용자가 히어로의 이름을 입력하면 이 내용이 페이지 위쪽에 표시되지만 "뒤로 가기 버튼"을 누르면 변경된 내용이 폐기된다.
히어로의 이름을 영구적으로 저장하려면 사용자가 입력한 내용을 서버로 보내서 저장해야 한다.
히어로 상세정보 화면을 정의하는 템플릿 제일 아래에 저장 버튼을 추가하고 이 버튼에 click 이벤트를 바인딩해 보자. 이 이벤트는 컴포넌트 클래스의 save() 메서드로 연결할 것이다.
그리고 아래 내용으로 HeroDetail 컴포넌트에 save() 메서드를 구현한다. 이 메서드는 HeroService.updateHero() 메서드를 실행해서 변경된 내용을 저장하고 이전 화면으로 돌아가는 동작을 한다.
save(): void {
  if (this.hero) {
    this.heroService.updateHero(this.hero)
      .subscribe(() => this.goBack());
  }
}
HeroService.updateHero() 추가하기
updateHero() 메서드는 getHeroes() 메서드와 거의 비슷하다. 대신 updateHero() 메서드는 http.get()이 아니라 http.put() 함수를 사용한다.
/** PUT: 서버에 저장된 히어로 데이터를 변경합니다. */
updateHero(hero: Hero): Observable<any> {
  return this.http.put(this.heroesUrl, hero, this.httpOptions).pipe(
    tap(_ => this.log(`updated hero id=${hero.id}`)),
    catchError(this.handleError<any>('updateHero'))
  );
}
HttpClient.put() 메서드는 3개의 인자를 받는다:
- URL
- 수정할 데이터(수정된 히어로 데이터)
- 옵션
URL은 변경되지 않았다. 이 예제에서 정의한 웹 API는 히어로의 id를 기준으로 수정할 히어로를 찾는다.
이번 예제에서 사용하는 웹 API에는 헤더가 존재한다. 이 헤더는 HeroService 안에 httpOptions 프로퍼티에 저장하고 상수처럼 사용할 것이다. HeroService 클래스에 다음 코드를 추가한다.
httpOptions = {
  headers: new HttpHeaders({ "Content-Type": "application/json" }),
};
이제 브라우저가 갱신된 후에 히어로의 이름을 변경하고 저장해보자. 그러면 HeroDetailComponent에 정의한 대로 이전 페이지로 돌아가는데, 전환된 화면에는 변경된 내용이 반영되어 표시될 것이다.
5. 새 히어로 추가하기
이 문서에서 만들고 있는 앱은 히어로를 추가할 때 이름만 있으면 된다. 화면에 <input> 엘리먼트 하나와 버튼 하나만 추가해 보자.
HeoresComponent 템플릿의 헤더 아래에 아래 내용을 추가한다:
<div>
  <label for="new-hero">Hero name: </label>
  <input id="new-hero" #heroName />

  <!-- (click) 이벤트를 감지하면 현재값을 인자로 전달하면서 add() 함수를 실행하고, 입력 필드를 비웁니다. -->
  <button class="add-button" (click)="add(heroName.value); heroName.value=''">
    Add hero
  </button>
</div>
클릭 이벤트가 발생하면 컴포넌트의 클릭 핸들러인 add() 메서드를 실행하고 입력 필드를 비우면서 다른 이름을 받을 준비를 한다. 이 로직을 HeroesComponent 클래스에 정의한다:
add(name: string): void {
  name = name.trim();
  if (!name) { return; }
  this.heroService.addHero({ name } as Hero)
    .subscribe(hero => {
      this.heroes.push(hero);
    });
}
사용자가 입력한 이름이 유효하다면 핸들러 함수는 이름을 사용해서 Hero와 호환되는 객체를 생성하고(id는 생략되었다) 이 객체를 addHero() 메서드로 전달한다.
그리고 addHero()가 문제없이 실행되면 subscribe() 콜백 함수가 새 히어로 객체를 받고 이 객체를 heroes 목록에 추가하기 때문에 화면에도 표시된다.
/** POST: 서버에 새로운 히어로를 추가합니다. */
addHero(hero: Hero): Observable<Hero> {
  return this.http.post<Hero>(this.heroesUrl, hero, this.httpOptions).pipe(
    tap((newHero: Hero) => this.log(`added hero w/ id=${newHero.id}`)),
    catchError(this.handleError<Hero>('addHero'))
  );
}
addHero()는 updateHero()와 두 가지가 다르다:
HttpClient.put()대신post()를 실행한다.- 이 함수를 실행하면 새로운 히어로에 대한
id가 생성되어야 하며,Observable<Hero>타입으로 변환된다.
브라우저를 새로고침하고 히어로를 추가해 보자.
6. 히어로 삭제하기
히어로 목록에 있는 가 항목엔느 제거 버튼이 있어야 한다.
그래서 HeroesComponent 템플릿의 <li> 엘리먼트로 반복되는 히어로 이름 뒤에 다음과 같은 버튼 엘리먼트를 추가한다.
<button class="delete" title="delete hero" (click)="delete(hero)">x</button>
그러면 히어로 목록을 표시하는 템플릿이 다음과 같이 구성될 것이다:
<ul class="heroes">
  <li *ngFor="let hero of heroes">
    <a routerLink="/detail/{{hero.id}}">
      <span class="badge">{{hero.id}}</span> {{hero.name}}
    </a>
    <button class="delete" title="delete hero" (click)="delete(hero)">x</button>
  </li>
</ul>
제거 버튼을 원하는 곳에 두려면 heroes.component.css 파일에 CSS 스타일을 추가해야 한다. 이 내용은 최종코드 리뷰 섹션에서 확인할 수 있다.
그 다음에는 컴포넌트 클래스에 delete() 핸들러를 추가한다.
delete(hero: Hero): void {
  this.heroes = this.heroes.filter(h => h !== hero);
  this.heroService.deleteHero(hero.id).subscribe();
}
히어로를 제거하는 기능은 HeroService가 담당하지만, 변경된 내용으로 화면을 갱신하는 것은 컴포넌트가 처리해야 한다. 그래서 컴포넌트에 정의된 delete() 메서드는 서버로 보내는 요청이 성공할 것으로 간주하고 이 히어로를 목록에서 바로 제거한다.
heroService.delete() 메서드를 실행하고 받은 Observable로는 아무것도 하지 않는다. 함수를 실행하기 위해 단순하게 구독만 할 뿐이다.
Note
subscribe()를 생략하면 서버로 제거 요청을 보내지 않는다.- 왜냐하면 아무도 구독하지 않은
Observable은 아무 동작도 하지 않기 때문이다.
그리고 HeroService에 다음과 같이 deleteHero() 메서드를 추가한다.
/** DELETE: 서버에서 히어로를 제거합니다. */
deleteHero(id: number): Observable<Hero> {
  const url = `${this.heroesUrl}/${id}`;

  return this.http.delete<Hero>(url, this.httpOptions).pipe(
    tap(_ => this.log(`deleted hero id=${id}`)),
    catchError(this.handleError<Hero>('deleteHero'))
  );
}
이런 점을 주목하자:
deleteHero()는HttpClient.delete()를 실행한다.- URL은 리소스 URL 뒤에 제거하려는 히어로의
id가 붙은 형태이다. put()이나post()를 실행할 때처럼 데이터를 보내지는 않는다.httpOptions는 그대로 사용한다.
이제 브라우저를 새로 고침하고 제거 기능이 제대로 동작하는지 확인해 보자.
7. 이름으로 검색하기
이전 섹션에서 알아본 것처럼 Observable 연산자를 체이닝하면 HTTP 요청을 최적화할 수 있으며, 결과적으로 네트워크 사용량을 절약할 수 있다.
이번에는 대시보드 화면에 히어로를 검색하는 기능을 추가해 보자. 사용자가 검색창에 히어로 이름을 입력하면 입력한 내용이 포함된 히어로의 목록을 받아오도록 HTTP 요청을 보낼 것이다. 이 때 진짜 필요할 때만 실제로 요청을 보내는 방법에 대해 알아보자.
HeroService.searchHeroes()
아래 내용으로 HeroService에 searchHeroes() 메서드를 추가한다.
/* GET: 입력된 문구가 이름에 포함된 히어로 목록을 반환합니다. */
searchHeroes(term: string): Observable<Hero[]> {
  if (!term.trim()) {
    // 입력된 내용이 없으면 빈 배열을 반환합니다.
    return of([]);
  }
  return this.http.get<Hero[]>(`${this.heroesUrl}/?name=${term}`).pipe(
    tap(x => x.length ?
       this.log(`found heroes matching "${term}"`) :
       this.log(`no heroes matching "${term}"`)),
    catchError(this.handleError<Hero[]>('searchHeroes', []))
  );
}
이 메서드는 입력된 내용이 없을 때 빈 배열을 즉시 반환한다. 이 경우가 아니라면 getHeroes()와 거의 비슷하다. 사용자가 입력한 문구가 URL에 쿼리 스트링으로 포함된다는 것만 다르다.
1) 대시보드에 검색 기능 추가하기
DashboardComponent 템플릿을 열고 이 템플릿 제일 아래에 <app-hero-search>를 추가한다.
<h2>Top Heroes</h2>
<div class="heroes-menu">
  <a *ngFor="let hero of heroes" routerLink="/detail/{{hero.id}}">
    {{hero.name}}
  </a>
</div>

<app-hero-search></app-hero-search>
이 템플릿은 HeroesComponent 템플릿에서 *ngFor 반복자가 사용된 부분과 거의 비슷하다.
이 부분을 구현하기 위해 다음 단계에서는 컴포넌트에 <app-hero-search> 컴포넌트를 추가해 보자.
2) HeroSearchComponent 생성하기
Angular CLI로 다음 명령을 실행해서 HeroSearchComponent를 생성한다.
그러면 Angular CLI가 HeroSearchComponent를 구성하는 파일을 생성하면서 AppModule에 이 컴포넌트를 자동으로 등록한다.
이렇게 생성된 HeroSearchComponent의 템플릿을 다음과 같이 수정한다. 이 템플릿에는 사용자가 내용을 입력할 수 있는 텍스트박스가 하나 있고, 검색 결과를 표시하는 목록이 있다.
<div id="search-component">
  <label for="search-box">Hero Search</label>
  <input #searchBox id="search-box" (input)="search(searchBox.value)" />

  <ul class="search-result">
    <li *ngFor="let hero of heroes$ | async">
      <a routerLink="/detail/{{hero.id}}"> {{hero.name}} </a>
    </li>
  </ul>
</div>
그리고 최종코드 리뷰에 있는 내용처럼 hero-search.component.css 파일에 컴포넌트 CSS 스타일을 추가한다.
이제 사용자가 검색창에 내용을 입력하면 입력 이벤트에 바인딩된 search() 메서드가 실행될 것이다.
3) AsyncPipe
*ngFor는 히어로 객체를 순회하는데, 이 때 heroes 배열 대신 heroes$를 사용한다. $는 Observable을 뜻하는 관용적 표현이다.
*ngFor 자체로는 Observable을 대상으로 어떤 작업도 수행하지 않기 때문에 파이프 문자(|)를 붙이고 async 파이프를 연결해 준다. 이 파이프는 AsyncPipe에 정의된 파이프이며, Observable을 자동으로 구독하는 역할을 한다. 컴포넌트에서 따로 구독할 필요는 없다.
4) HeroSearchComponent 클래스 수정하기
Angular CLI가 생성한 HeroSearchComponent 클래스와 메타데이터의 내용을 다음과 같이 수정한다.
import { Component, OnInit } from "@angular/core";

import { Observable, Subject } from "rxjs";

import { debounceTime, distinctUntilChanged, switchMap } from "rxjs/operators";

import { Hero } from "../hero";
import { HeroService } from "../hero.service";

@Component({
  selector: "app-hero-search",
  templateUrl: "./hero-search.component.html",
  styleUrls: ["./hero-search.component.css"],
})
export class HeroSearchComponent implements OnInit {
  heroes$!: Observable<Hero[]>;
  private searchTerms = new Subject<string>();

  constructor(private heroService: HeroService) {}

  // 사용자가 입력한 검색어를 옵저버블 스트림으로 보냅니다.
  search(term: string): void {
    this.searchTerms.next(term);
  }

  ngOnInit(): void {
    this.heroes$ = this.searchTerms.pipe(
      // 연속된 키입력을 처리하기 위해 300ms 대기합니다.
      debounceTime(300),

      // 이전에 입력한 검색어와 같으면 무시합니다.
      distinctUntilChanged(),

      // 검색어가 변경되면 새로운 옵저버블을 생성합니다.
      switchMap((term: string) => this.heroService.searchHeroes(term))
    );
  }
}
heroes$ 프로퍼티는 Observable 타입으로 선언하는 것을 잊지 말자.
이 옵저버블 구독은 ngOnInit()에서 시작된다. 지금은 searchTerms을 선언하는 방법에 대해 먼저 알아보자.
5) searchTerms RxJS Subject
searchTerms 프로퍼티는 RxJS가 제공하는 Subject 객체로 선언한다.
private searchTerms = new Subject<string>();

// 사용자가 입력한 검색어를 옵저버블 스트림으로 보냅니다.
search(term: string): void {
  this.searchTerms.next(term);
}
Subject는 옵저버블의 원천 소스이며 Observable 그 자체이기도 하다. 그래서 Subject 객체는 Observable 객체처럼 구독할 수도 있다.
그리고 Observable로 값을 보내기 위해 next(value) 메서드를 실행할 수도 있다. search() 메서드에서 이 함수를 사용했다.
<input> 엘리먼트와 이벤트 바인딩된 search() 메서드가 이런 방식으로 동작한다.
<input #searchBox id="search-box" (input)="search(searchBox.value)" />
사용자가 텍스트박스에 키보드를 입력할 때마다 입력된 내용이 인자로 전달되면서 search() 메서드가 실행된다. 이 메서드에서 searchTerms 프로퍼티는 Observable로 동작하며, 사용자가 입력한 내용을 옵저버블 스트림으로 보낸다.
6) RxJS 연산자 체이닝하기
사용자가 입력한 검색어가 searchHeroes()로 바로 넘어간다면 사용자의 키입력마다 HTTP 요청이 발생하기 때문에 수많은 HTTP 요청이 발생할 것이다. 이렇게 되면 서버에 과도한 부하가 걸릴 수 있으며 모바일 장비의 네트워크 요금도 빠르게 올라갈 것이다.
이 방법보다는 ngOnInit() 메서드에 searchTerms 옵저버블로 데이터를 보낼 때 RxJS 연산자로 체이닝해서 searchHeroes()로 전달되는 것을 최적화하는 것이 더 좋다.
코드를 자세하게 보자.
this.heroes$ = this.searchTerms.pipe(
  // 연속된 키입력을 처리하기 위해 300ms 대기합니다.
  debounceTime(300),

  // 이전에 입력한 검색어와 같으면 무시합니다.
  distinctUntilChanged(),

  // 검색어가 변경되면 새로운 옵저버블을 생성합니다.
  switchMap((term: string) => this.heroService.searchHeroes(term))
);
각 연산자는 이렇게 동작한다:
debounceTime(300)는 옵저버블로 전달된 문자열을 바로 보내지 않고 다음 이벤트가 올 때까지 300 밀리초 기다린다. 사용자가 보내는 요청은 300msdp 하나로 제한된다.distinctUntilChanged()는 사용자가 입력한 문자열의 내용이 변경되었을 때만 옵저버블 스트림을 전달한다.switchMap()는 옵저버블 스트림이debounceTime와distinctUntilChanged를 통과했을 때 서비스에 있는 검색 기능을 호출한다. 이 때 이전에 발생했던 옵저버블은 취소되며,HeroService가 생성한 옵저버블만 반환한다.
Note
switchMap연산자를 사용하면 옵저버블 체이닝을 통과한 키이벤트마다HttpClient.get()메서드가 실행된다.- 그런데 요청을 300ms 당 한 번으로 제한하더라도 동작 중인 HTTP 요청은 여러 개가 될 수 있으며, 응답이 돌아오는 순서도 보낸 순서와 다를 수 있다.
- 이 때
switchMap()연산자를 활용하면 이전에 보낸 HTTP 요청을 취소하고 제일 마지막에 보낸 HTTP 요청만 남겨둘 수 있다. - 하지만 이전에 발생한
searchHeroes()옵저버블을 취소했다고 해서 이미 보낸 HTTP 요청을 취소하지는 않는다. - 이미 보낸 HTTP 요청에 대한 응답은 애플리케이션 코드에 도달하지 못하고 그냥 폐기된다.
컴포넌트 클래스에서 heroes$ 옵저버블을 구독하지 않는 것에 주의한다. AsyncPipe는 템플릿에서 옵저버블을 구독하기 위해 사용되었다.
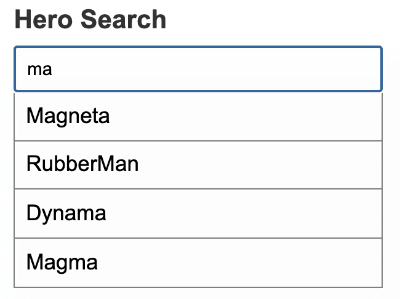
동작 확인하기
애플리케이션을 다시 실행해 보자. 대시보드 화면에 있는 검색창에 무언가를 입력했을 때 이 입력값이 포함된 히어로의 이름이 있으면 다음과 같은 모습으로 화면에 표시될 것이다.
8. 최종코드 리뷰
이 문서에서 다룬 코드들을 확인해 보자.
1) HeroService, InMemoryDataService, AppModule
import { Injectable } from "@angular/core";
import { HttpClient, HttpHeaders } from "@angular/common/http";

import { Observable, of } from "rxjs";
import { catchError, map, tap } from "rxjs/operators";

import { Hero } from "./hero";
import { MessageService } from "./message.service";

@Injectable({ providedIn: "root" })
export class HeroService {
  private heroesUrl = "api/heroes"; // 웹 API 형식의 URL로 사용

  httpOptions = {
    headers: new HttpHeaders({ "Content-Type": "application/json" }),
  };

  constructor(
    private http: HttpClient,
    private messageService: MessageService
  ) {}

  /** GET: 서버에서 히어로 목록 가져오기 */
  getHeroes(): Observable<Hero[]> {
    return this.http.get<Hero[]>(this.heroesUrl).pipe(
      tap((_) => this.log("fetched heroes")),
      catchError(this.handleError<Hero[]>("getHeroes", []))
    );
  }

  /** GET: id에 해당하는 히어로 데이터를 가져옵니다. 존재하지 않으면 `undefined`를 반환합니다. */
  getHeroNo404<Data>(id: number): Observable<Hero> {
    const url = `${this.heroesUrl}/?id=${id}`;
    return this.http.get<Hero[]>(url).pipe(
      map((heroes) => heroes[0]), // 배열에 있는 항목 중 하나만 반환합니다.
      tap((h) => {
        const outcome = h ? `fetched` : `did not find`;
        this.log(`${outcome} hero id=${id}`);
      }),
      catchError(this.handleError<Hero>(`getHero id=${id}`))
    );
  }

  /** GET: id에 해당하는 히어로 데이터 가져오기. 존재하지 않으면 404를 반환합니다. */
  getHero(id: number): Observable<Hero> {
    const url = `${this.heroesUrl}/${id}`;
    return this.http.get<Hero>(url).pipe(
      tap((_) => this.log(`fetched hero id=${id}`)),
      catchError(this.handleError<Hero>(`getHero id=${id}`))
    );
  }

  /* GET: 입력된 문구가 이름에 포함된 히어로 목록을 반환합니다. */
  searchHeroes(term: string): Observable<Hero[]> {
    if (!term.trim()) {
      // 입력된 내용이 없으면 빈 배열을 반환합니다.
      return of([]);
    }
    return this.http.get<Hero[]>(`${this.heroesUrl}/?name=${term}`).pipe(
      tap((x) =>
        x.length
          ? this.log(`found heroes matching "${term}"`)
          : this.log(`no heroes matching "${term}"`)
      ),
      catchError(this.handleError<Hero[]>("searchHeroes", []))
    );
  }

  //////// 저장 기능 //////////

  /** POST: 서버에 새로운 히어로를 추가합니다. */
  addHero(hero: Hero): Observable<Hero> {
    return this.http.post<Hero>(this.heroesUrl, hero, this.httpOptions).pipe(
      tap((newHero: Hero) => this.log(`added hero w/ id=${newHero.id}`)),
      catchError(this.handleError<Hero>("addHero"))
    );
  }

  /** DELETE: 서버에서 히어로를 제거합니다. */
  deleteHero(id: number): Observable<Hero> {
    const url = `${this.heroesUrl}/${id}`;

    return this.http.delete<Hero>(url, this.httpOptions).pipe(
      tap((_) => this.log(`deleted hero id=${id}`)),
      catchError(this.handleError<Hero>("deleteHero"))
    );
  }

  /** PUT: 서버에 저장된 히어로 데이터를 변경합니다. */
  updateHero(hero: Hero): Observable<any> {
    return this.http.put(this.heroesUrl, hero, this.httpOptions).pipe(
      tap((_) => this.log(`updated hero id=${hero.id}`)),
      catchError(this.handleError<any>("updateHero"))
    );
  }

  /**
   * HTTP 요청이 실패한 경우를 처리합니다.
   * 애플리케이션 로직 흐름은 그대로 유지됩니다.
   * @param operation - 실패한 동작의 이름
   * @param result - 기본값으로 반환할 객체
   */
  private handleError<T>(operation = "operation", result?: T) {
    return (error: any): Observable<T> => {
      // TODO: 리모트 서버로 에러 메시지 보내기
      console.error(error); // 지금은 콘솔에 로그를 출력합니다.

      // TODO: 사용자가 이해할 수 있는 형태로 변환하기
      this.log(`${operation} failed: ${error.message}`);

      // 애플리케이션 로직이 끊기지 않도록 기본값으로 받은 객체를 반환합니다.
      return of(result as T);
    };
  }

  /** HeroService에서 보내는 메시지는 MessageService가 화면에 표시합니다. */
  private log(message: string) {
    this.messageService.add(`HeroService: ${message}`);
  }
}
import { Injectable } from "@angular/core";
import { InMemoryDbService } from "angular-in-memory-web-api";
import { Hero } from "./hero";

@Injectable({
  providedIn: "root",
})
export class InMemoryDataService implements InMemoryDbService {
  createDb() {
    const heroes = [
      { id: 11, name: "Dr Nice" },
      { id: 12, name: "Narco" },
      { id: 13, name: "Bombasto" },
      { id: 14, name: "Celeritas" },
      { id: 15, name: "Magneta" },
      { id: 16, name: "RubberMan" },
      { id: 17, name: "Dynama" },
      { id: 18, name: "Dr IQ" },
      { id: 19, name: "Magma" },
      { id: 20, name: "Tornado" },
    ];
    return { heroes };
  }

  // 히어로 객체가 항상 id 프로퍼티를 갖도록 getId 메소드를 오버라이드 합니다.
  // 히어로 목록이 비어있다면 이 메소드는 초기값(11)을 반환합니다.
  // 히어로 목록이 비어있지 않으면 히어로 id의 최대값에 1을 더해서 반환합니다.
  genId(heroes: Hero[]): number {
    return heroes.length > 0
      ? Math.max(...heroes.map((hero) => hero.id)) + 1
      : 11;
  }
}
import { NgModule } from "@angular/core";
import { BrowserModule } from "@angular/platform-browser";
import { FormsModule } from "@angular/forms";
import { HttpClientModule } from "@angular/common/http";

import { HttpClientInMemoryWebApiModule } from "angular-in-memory-web-api";
import { InMemoryDataService } from "./in-memory-data.service";

import { AppRoutingModule } from "./app-routing.module";

import { AppComponent } from "./app.component";
import { DashboardComponent } from "./dashboard/dashboard.component";
import { HeroDetailComponent } from "./hero-detail/hero-detail.component";
import { HeroesComponent } from "./heroes/heroes.component";
import { HeroSearchComponent } from "./hero-search/hero-search.component";
import { MessagesComponent } from "./messages/messages.component";

@NgModule({
  imports: [
    BrowserModule,
    FormsModule,
    AppRoutingModule,
    HttpClientModule,

    // HttpClientInMemoryWebApiModule 모듈은 HTTP 요청을 가로채고 서버의 응답을 흉내냅니다.
    // 실제 서버가 준비되면 이 부분을 제거하면 됩니다.
    HttpClientInMemoryWebApiModule.forRoot(InMemoryDataService, {
      dataEncapsulation: false,
    }),
  ],
  declarations: [
    AppComponent,
    DashboardComponent,
    HeroesComponent,
    HeroDetailComponent,
    MessagesComponent,
    HeroSearchComponent,
  ],
  bootstrap: [AppComponent],
})
export class AppModule {}
2) HeroesComponent
<h2>My Heroes</h2>

<div>
  <label for="new-hero">Hero name: </label>
  <input id="new-hero" #heroName />

  <!-- (click) 이벤트를 감지하면 현재값을 인자로 전달하면서 add() 함수를 실행하고, 입력 필드를 비웁니다. -->
  <button class="add-button" (click)="add(heroName.value); heroName.value=''">
    Add hero
  </button>
</div>

<ul class="heroes">
  <li *ngFor="let hero of heroes">
    <a routerLink="/detail/{{hero.id}}">
      <span class="badge">{{hero.id}}</span> {{hero.name}}
    </a>
    <button class="delete" title="delete hero" (click)="delete(hero)">x</button>
  </li>
</ul>
import { Component, OnInit } from "@angular/core";

import { Hero } from "../hero";
import { HeroService } from "../hero.service";

@Component({
  selector: "app-heroes",
  templateUrl: "./heroes.component.html",
  styleUrls: ["./heroes.component.css"],
})
export class HeroesComponent implements OnInit {
  heroes: Hero[] = [];

  constructor(private heroService: HeroService) {}

  ngOnInit() {
    this.getHeroes();
  }

  getHeroes(): void {
    this.heroService.getHeroes().subscribe((heroes) => (this.heroes = heroes));
  }

  add(name: string): void {
    name = name.trim();
    if (!name) {
      return;
    }
    this.heroService.addHero({ name } as Hero).subscribe((hero) => {
      this.heroes.push(hero);
    });
  }

  delete(hero: Hero): void {
    this.heroes = this.heroes.filter((h) => h !== hero);
    this.heroService.deleteHero(hero.id).subscribe();
  }
}
/* HeroesComponent 컴포넌트에 적용되는 CSS 스타일 */
.heroes {
  margin: 0 0 2em 0;
  list-style-type: none;
  padding: 0;
  width: 15em;
}

input {
  display: block;
  width: 100%;
  padding: 0.5rem;
  margin: 1rem 0;
  box-sizing: border-box;
}

.heroes li {
  position: relative;
  cursor: pointer;
}

.heroes li:hover {
  left: 0.1em;
}

.heroes a {
  color: #333;
  text-decoration: none;
  background-color: #eee;
  margin: 0.5em;
  padding: 0.3em 0;
  height: 1.6em;
  border-radius: 4px;
  display: block;
  width: 100%;
}

.heroes a:hover {
  color: #2c3a41;
  background-color: #e6e6e6;
}

.heroes a:active {
  background-color: #525252;
  color: #fafafa;
}

.heroes .badge {
  display: inline-block;
  font-size: small;
  color: white;
  padding: 0.8em 0.7em 0 0.7em;
  background-color: #405061;
  line-height: 1em;
  position: relative;
  left: -1px;
  top: -4px;
  height: 1.8em;
  min-width: 16px;
  text-align: right;
  margin-right: 0.8em;
  border-radius: 4px 0 0 4px;
}

.add-button {
  padding: 0.5rem 1.5rem;
  font-size: 1rem;
  margin-bottom: 2rem;
}

.add-button:hover {
  color: white;
  background-color: #42545c;
}

button.delete {
  position: absolute;
  left: 210px;
  top: 5px;
  background-color: white;
  color: #525252;
  font-size: 1.1rem;
  padding: 1px 10px 3px 10px;
}

button.delete:hover {
  background-color: #525252;
  color: white;
}
3) HeroDetailComponent
<div *ngIf="hero">
  <h2>{{hero.name | uppercase}} Details</h2>
  <div><span>id: </span>{{hero.id}}</div>
  <div>
    <label for="hero-name">Hero name: </label>
    <input id="hero-name" [(ngModel)]="hero.name" placeholder="Hero name" />
  </div>
  <button (click)="goBack()">go back</button>
  <button (click)="save()">save</button>
</div>
import { Component, OnInit } from "@angular/core";
import { ActivatedRoute } from "@angular/router";
import { Location } from "@angular/common";

import { Hero } from "../hero";
import { HeroService } from "../hero.service";

@Component({
  selector: "app-hero-detail",
  templateUrl: "./hero-detail.component.html",
  styleUrls: ["./hero-detail.component.css"],
})
export class HeroDetailComponent implements OnInit {
  hero: Hero | undefined;

  constructor(
    private route: ActivatedRoute,
    private heroService: HeroService,
    private location: Location
  ) {}

  ngOnInit(): void {
    this.getHero();
  }

  getHero(): void {
    const id = parseInt(this.route.snapshot.paramMap.get("id")!, 10);
    this.heroService.getHero(id).subscribe((hero) => (this.hero = hero));
  }

  goBack(): void {
    this.location.back();
  }

  save(): void {
    if (this.hero) {
      this.heroService.updateHero(this.hero).subscribe(() => this.goBack());
    }
  }
}
4) DashboardComponent
<h2>Top Heroes</h2>
<div class="heroes-menu">
  <a *ngFor="let hero of heroes" routerLink="/detail/{{hero.id}}">
    {{hero.name}}
  </a>
</div>

<app-hero-search></app-hero-search>
5) HeroSearchComponent
import { Component, OnInit } from "@angular/core";

import { Observable, Subject } from "rxjs";

import { debounceTime, distinctUntilChanged, switchMap } from "rxjs/operators";

import { Hero } from "../hero";
import { HeroService } from "../hero.service";

@Component({
  selector: "app-hero-search",
  templateUrl: "./hero-search.component.html",
  styleUrls: ["./hero-search.component.css"],
})
export class HeroSearchComponent implements OnInit {
  heroes$!: Observable<Hero[]>;
  private searchTerms = new Subject<string>();

  constructor(private heroService: HeroService) {}

  // 사용자가 입력한 검색어를 옵저버블 스트림으로 보냅니다.
  search(term: string): void {
    this.searchTerms.next(term);
  }

  ngOnInit(): void {
    this.heroes$ = this.searchTerms.pipe(
      // 연속된 키입력을 처리하기 위해 300ms 대기합니다.
      debounceTime(300),

      // 이전에 입력한 검색어와 같으면 무시합니다.
      distinctUntilChanged(),

      // 검색어가 변경되면 새로운 옵저버블을 생성합니다.
      switchMap((term: string) => this.heroService.searchHeroes(term))
    );
  }
}
/* HeroSearch 컴포넌트에 적용되는 CSS 스타일 */

label {
  display: block;
  font-weight: bold;
  font-size: 1.2rem;
  margin-top: 1rem;
  margin-bottom: 0.5rem;
}
input {
  padding: 0.5rem;
  width: 100%;
  max-width: 600px;
  box-sizing: border-box;
  display: block;
}

input:focus {
  outline: #336699 auto 1px;
}

li {
  list-style-type: none;
}
.search-result li a {
  border-bottom: 1px solid gray;
  border-left: 1px solid gray;
  border-right: 1px solid gray;
  display: inline-block;
  width: 100%;
  max-width: 600px;
  padding: 0.5rem;
  box-sizing: border-box;
  text-decoration: none;
  color: black;
}

.search-result li a:hover {
  background-color: #435a60;
  color: white;
}

ul.search-result {
  margin-top: 0;
  padding-left: 0;
}
9. 정리
이번 튜토리얼을 진행하면서 다음과 같은 내용에 대해 알아봤다.
- HTTP 요청을 보내는 방법에 대해 알아봤다. HTTP 요청은 꼭 필요한 경우에만 보내는 것이 좋다.
HeroService가 웹 API를 사용해서 히어로 데이터를 가져오도록 리팩토링했다.HttpClient가 제공하는post(),put(),delete()메서드를 사용해서HeroService를 확장했다.- 히어로를 추가하고, 수정하고, 제거할 수 있도록 컴포넌트를 수정했다.
- 인-메모리 웹 API를 설정하는 방법에 대해 알아봤다.
- 옵저버블을 사용하는 방법에 대해 알아봤다.