4. 컴포넌트 통신
이 가이드 문서는 둘 이상의 컴포넌트가 서로 데이터를 공유하는 방법을 다룬다.
이 문서에서 다루는 예제는 라이브 예제 링크 / 다운로드 링크에서 확인할 수 있다.
1. 부모 컴포넌트에서 자식 컴포넌트로 데이터 전달하기: 입력 바인딩
HeroChildComponent에는 입력 프로퍼티가 두 개 있다. 입력 프로퍼티는 @Input 데코레이터를 붙여 선언한다.
import { Component, Input } from "@angular/core";

import { Hero } from "./hero";

@Component({
  selector: "app-hero-child",
  template: `
    <h3>{{ hero.name }} says:</h3>
    <p>I, {{ hero.name }}, am at your service, {{ masterName }}.</p>
  `,
})
export class HeroChildComponent {
  @Input() hero!: Hero;
  @Input("master") masterName = ""; // tslint:disable-line: no-input-rename
}
이 코드에 선언된 입력 프로퍼티 중 두 번째 @Input에는 masterName 프로퍼티를 외부에서 바인딩 할 때 'master'라는 이름으로 사용하기 위한 선언이 추가되어 있다.
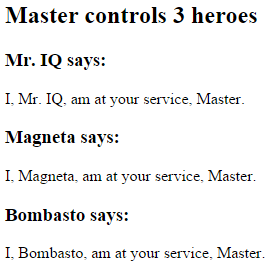
HeroParentComponent는 *ngFor를 사용해서 배열에 있는 항목마다 HeroChildComponent를 만드는데, 각 컴포넌트를 만들 때마다 master 문자열 프로퍼티를 자식 컴포넌트의 master로 연결하고, 반복되는 hero 인스턴스를 자식 컴포넌트의 hero 프로퍼티로 바인딩 한다.
import { Component } from "@angular/core";

import { HEROES } from "./hero";

@Component({
  selector: "app-hero-parent",
  template: `
    <h2>{{ master }} controls {{ heroes.length }} heroes</h2>

    <app-hero-child *ngFor="let hero of heroes" [hero]="hero" [master]="master">
    </app-hero-child>
  `,
})
export class HeroParentComponent {
  heroes = HEROES;
  master = "Master";
}
이 애플리케이션을 실행하면 다음과 같이 세 명의 히어로가 표시된다:
반복문을 순회하며 가각의 히어로마다 결과를 제대로 표시하는지 확인하기 위해 E2E 테스트 환경을 다음과 같이 설정한다:
// ...
const heroNames = ["Dr IQ", "Magneta", "Bombasto"];
const masterName = "Master";

it("should pass properties to children properly", async () => {
  const parent = element(by.tagName("app-hero-parent"));
  const heroes = parent.all(by.tagName("app-hero-child"));

  for (let i = 0; i < heroNames.length; i++) {
    const childTitle = await heroes.get(i).element(by.tagName("h3")).getText();
    const childDetail = await heroes.get(i).element(by.tagName("p")).getText();
    expect(childTitle).toEqual(heroNames[i] + " says:");
    expect(childDetail).toContain(masterName);
  }
});
// ...
2. 입력 프로퍼티를 세터(setter)로 가로채기
부모 컴포넌트에서 값이 전달될 때 추가 로직을 실행하기 위해 입력 프로퍼티에 세터를 사용해 보자.
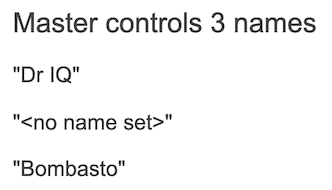
자식 컴포넌트 NameChildComponent의 입력 프로퍼티 name에 세터를 연결해서 전달되는 문자열의 여백 문자를 다른 문자로 변경해 보자.
import { Component, Input } from "@angular/core";

@Component({
  selector: "app-name-child",
  template: '<h3>"{{name}}"</h3>',
})
export class NameChildComponent {
  @Input()
  get name(): string {
    return this._name;
  }
  set name(name: string) {
    this._name = (name && name.trim()) || "<no name set>";
  }
  private _name = "";
}
그리고 부모 컴포넌트인 NameParentComponent는 자식 컴포넌트에 다음과 같이 몇 가지 경우를 적용해 본다:
import { Component } from "@angular/core";

@Component({
  selector: "app-name-parent",
  template: `
    <h2>Master controls {{ names.length }} names</h2>

    <app-name-child *ngFor="let name of names" [name]="name"></app-name-child>
  `,
})
export class NameParentComponent {
  // 'Dr IQ', '<빈 값>', 'Bombasto'를 표시합니다.
  names = ["Dr IQ", "   ", "  Bombasto  "];
}
입력 프로퍼티 세터를 테스트하는 E2E 환경은 다음과 같이 설정한다:
// ...
it("should display trimmed, non-empty names", async () => {
  const nonEmptyNameIndex = 0;
  const nonEmptyName = '"Dr IQ"';
  const parent = element(by.tagName("app-name-parent"));
  const hero = parent.all(by.tagName("app-name-child")).get(nonEmptyNameIndex);

  const displayName = await hero.element(by.tagName("h3")).getText();
  expect(displayName).toEqual(nonEmptyName);
});

it("should replace empty name with default name", async () => {
  const emptyNameIndex = 1;
  const defaultName = '"<no name set>"';
  const parent = element(by.tagName("app-name-parent"));
  const hero = parent.all(by.tagName("app-name-child")).get(emptyNameIndex);

  const displayName = await hero.element(by.tagName("h3")).getText();
  expect(displayName).toEqual(defaultName);
});
// ...
3. ngOnChanges()로 입력 프로퍼티 가로채기
입력 프로퍼티는 OnChanges 라이프싸이클 후킹 인터페이스를 사용하는 ngOnChanges() 메서드로도 가로챌 수 있다.
입력 프로퍼티 여러 개를 가로채야 한다면 세터를 사용하는 것보다 이 방식이 더 편할 수 있다.
Note
ngOnChanges()함수에 대한 자세한 설명은 라이프싸이클 후킹 문서를 참고한다.
VersionChildComponent는 major와 minor 두 입력 프로퍼티 값이 변경되는 것을 감지하고 이 내용을 로그로 출력한다:
import { Component, Input, OnChanges, SimpleChanges } from "@angular/core";

@Component({
  selector: "app-version-child",
  template: `
    <h3>Version {{ major }}.{{ minor }}</h3>
    <h4>Change log:</h4>
    <ul>
      <li *ngFor="let change of changeLog">{{ change }}</li>
    </ul>
  `,
})
export class VersionChildComponent implements OnChanges {
  @Input() major = 0;
  @Input() minor = 0;
  changeLog: string[] = [];

  ngOnChanges(changes: SimpleChanges) {
    const log: string[] = [];
    for (const propName in changes) {
      const changedProp = changes[propName];
      const to = JSON.stringify(changedProp.currentValue);
      if (changedProp.isFirstChange()) {
        log.push(`Initial value of ${propName} set to ${to}`);
      } else {
        const from = JSON.stringify(changedProp.previousValue);
        log.push(`${propName} changed from ${from} to ${to}`);
      }
    }
    this.changeLog.push(log.join(", "));
  }
}
그리고 부모 컴포넌트 VersionParentComponent는 자식 컴포넌트에 바인딩되는 minor, major 두 값을 버튼으로 조정한다.
import { Component } from "@angular/core";
@Component({
selector: "app-version-parent",
template: `
<h2>Source code version</h2>
<button (click)="newMinor()">New minor version</button>
<button (click)="newMajor()">New major version</button>
<app-version-child [major]="major" [minor]="minor"></app-version-child>
`,
})
export class VersionParentComponent {
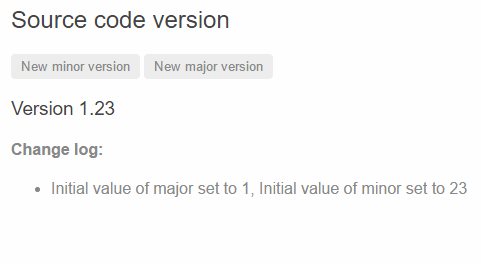
major = 1;
minor = 23;
newMinor() {
this.minor++;
}
newMajor() {
this.major++;
this.minor = 0;
}
}
버튼을 눌렀을 때 화면은 이렇다:
두 입력 프로퍼티는 초기값이 설정된 이후에 버튼을 누를 때마다 값이 변경되면서 ngOnChanges()를 실행하는데, 이 동작을 테스트하는 E2E 환경을 다음과 같이 정의한다:
// ...
// 테스트는 정확히 이 순서대로 실행됩니다.
it("should set expected initial values", async () => {
  const actual = await getActual();

  const initialLabel = "Version 1.23";
  const initialLog =
    "Initial value of major set to 1, Initial value of minor set to 23";

  expect(actual.label).toBe(initialLabel);
  expect(actual.count).toBe(1);
  expect(await actual.logs.get(0).getText()).toBe(initialLog);
});

it("should set expected values after clicking 'Minor' twice", async () => {
  const repoTag = element(by.tagName("app-version-parent"));
  const newMinorButton = repoTag.all(by.tagName("button")).get(0);

  await newMinorButton.click();
  await newMinorButton.click();

  const actual = await getActual();

  const labelAfter2Minor = "Version 1.25";
  const logAfter2Minor = "minor changed from 24 to 25";

  expect(actual.label).toBe(labelAfter2Minor);
  expect(actual.count).toBe(3);
  expect(await actual.logs.get(2).getText()).toBe(logAfter2Minor);
});

it("should set expected values after clicking 'Major' once", async () => {
  const repoTag = element(by.tagName("app-version-parent"));
  const newMajorButton = repoTag.all(by.tagName("button")).get(1);

  await newMajorButton.click();
  const actual = await getActual();

  const labelAfterMajor = "Version 2.0";
  const logAfterMajor = "major changed from 1 to 2, minor changed from 23 to 0";

  expect(actual.label).toBe(labelAfterMajor);
  expect(actual.count).toBe(2);
  expect(await actual.logs.get(1).getText()).toBe(logAfterMajor);
});

async function getActual() {
  const versionTag = element(by.tagName("app-version-child"));
  const label = await versionTag.element(by.tagName("h3")).getText();
  const ul = versionTag.element(by.tagName("ul"));
  const logs = ul.all(by.tagName("li"));

  return {
    label,
    logs,
    count: await logs.count(),
  };
}
// ...
4. 자식 컴포넌트에서 보내는 이벤트 받기
자식 컴포넌트에서 어떤 이벤트가 발생하면 이 이벤트는 EventEmitter 타입으로 지정한 프로퍼티를 통해 부모 컴포넌트에게 보낼 수 있다. 부모 컴포넌트는 이 이벤트를 바인딩해서 원하는 로직을 실행하면 된다.
자식 컴포넌트에서 외부로 이벤트를 보내려면 EventEmitter 타입으로 선언한 프로퍼티에 @Output 데코레이터를 사용해서 출력 프로퍼티로 지정하면 된다. VoterComponent에서는 다음과 같이 선언했다:
import { Component, EventEmitter, Input, Output } from "@angular/core";

@Component({
  selector: "app-voter",
  template: `
    <h4>{{ name }}</h4>
    <button (click)="vote(true)" [disabled]="didVote">Agree</button>
    <button (click)="vote(false)" [disabled]="didVote">Disagree</button>
  `,
})
export class VoterComponent {
  @Input() name = "";
  @Output() voted = new EventEmitter<boolean>();
  didVote = false;

  vote(agreed: boolean) {
    this.voted.emit(agreed);
    this.didVote = true;
  }
}
이 예제에서 버튼을 클릭하면 자식 컴포넌트로 불리언 타입의 데이터를 전달한다.
그리고 VoteTakerComponent의 onVoted() 함수가 이벤트 객체를 인자로 받아서 agree와 disagree 카운터를 갱신한다.
import { Component } from "@angular/core";

@Component({
  selector: "app-vote-taker",
  template: `
    <h2>Should mankind colonize the Universe?</h2>
    <h3>Agree: {{ agreed }}, Disagree: {{ disagreed }}</h3>

    <app-voter
      *ngFor="let voter of voters"
      [name]="voter"
      (voted)="onVoted($event)"
    >
    </app-voter>
  `,
})
export class VoteTakerComponent {
  agreed = 0;
  disagreed = 0;
  voters = ["Narco", "Celeritas", "Bombasto"];

  onVoted(agreed: boolean) {
    agreed ? this.agreed++ : this.disagreed++;
  }
}
이 때 전달되는 이벤트 객체는 템플릿에서 $event라는 이름으로 접근할 수 있으며, 템플릿에서 이벤트 핸들러 함수에 인자로 전달하기 때문에 컴포넌트 클래스 코드에서 이 이벤트 객체를 활용할 수 있다:
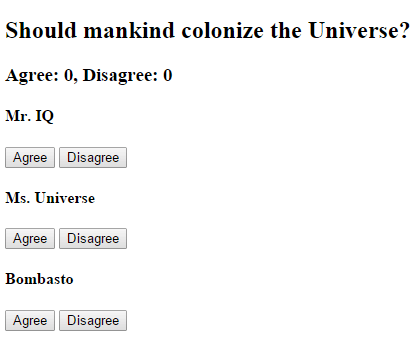
Agree 버튼이나 Disagree 버튼을 클릭하면 해당 카운터 값이 증가한다.
// ...
it("should not emit the event initially", async () => {
  const voteLabel = element(by.tagName("app-vote-taker")).element(
    by.tagName("h3")
  );
  expect(await voteLabel.getText()).toBe("Agree: 0, Disagree: 0");
});

it("should process Agree vote", async () => {
  const voteLabel = element(by.tagName("app-vote-taker")).element(
    by.tagName("h3")
  );
  const agreeButton1 = element
    .all(by.tagName("app-voter"))
    .get(0)
    .all(by.tagName("button"))
    .get(0);

  await agreeButton1.click();

  expect(await voteLabel.getText()).toBe("Agree: 1, Disagree: 0");
});

it("should process Disagree vote", async () => {
  const voteLabel = element(by.tagName("app-vote-taker")).element(
    by.tagName("h3")
  );
  const agreeButton1 = element
    .all(by.tagName("app-voter"))
    .get(1)
    .all(by.tagName("button"))
    .get(1);

  await agreeButton1.click();

  expect(await voteLabel.getText()).toBe("Agree: 0, Disagree: 1");
});
// ...
5. 템플릿 지역 변수로 자식 컴포넌트에 접근하기
부모 컴포넌트는 자식 컴포넌트의 프로퍼티나 메소드에 직접 접근할 수 없다. 하지만 부모 템플릿에 템플릿 참조 변수를 선언하면 자식 컴포넌트의 프로퍼티나 메소드에 접근할 수 있다.
다음 예제에서 CountdownTimerComponent는 타이머를 동작시켜서 카운트가 0이 되면 로켓을 발사한다고 하자. 그리고 이 컴포넌트에 있는 start 메소드와 stop 메소드는 각각 타이머를 시작하거나 정지한다.
import { Component, OnDestroy } from "@angular/core";

@Component({
  selector: "app-countdown-timer",
  template: "<p>{{message}}</p>",
})
export class CountdownTimerComponent implements OnDestroy {
  intervalId = 0;
  message = "";
  seconds = 11;

  ngOnDestroy() {
    this.clearTimer();
  }

  start() {
    this.countDown();
  }
  stop() {
    this.clearTimer();
    this.message = `Holding at T-${this.seconds} seconds`;
  }

  private clearTimer() {
    clearInterval(this.intervalId);
  }

  private countDown() {
    this.clearTimer();
    this.intervalId = window.setInterval(() => {
      this.seconds -= 1;
      if (this.seconds === 0) {
        this.message = "Blast off!";
      } else {
        if (this.seconds < 0) {
          this.seconds = 10;
        } // reset
        this.message = `T-${this.seconds} seconds and counting`;
      }
    }, 1000);
  }
}
부모 컴포넌트인 CountdownLocalVarParentComponent는 자식 컴포넌트를 다음과 같이 활용한다:
import { Component } from "@angular/core";
import { CountdownTimerComponent } from "./countdown-timer.component";

@Component({
  selector: "app-countdown-parent-lv",
  template: `
    <h3>Countdown to Liftoff (via local variable)</h3>
    <button (click)="timer.start()">Start</button>
    <button (click)="timer.stop()">Stop</button>
    <div class="seconds">{{ timer.seconds }}</div>
    <app-countdown-timer #timer></app-countdown-timer>
  `,
  styleUrls: ["../assets/demo.css"],
})
export class CountdownLocalVarParentComponent {}
원래 부모 컴포넌트는 자식 컴포넌트의 seconds 프로퍼티나 start, stop 메소드에 직접 접근할 수 없다.
하지만 <countdown-timer>를 템플릿 지역 변수 #timer로 선언하면 이 변수를 사용해서 자식 컴포넌트에 접근할 수 있다. 이 템플릿 지역 변수는 자식 컴포넌트 자체를 가리키며, 템플릿 지역 변수를 선언한 후에는 부모 컴포넌트의 템플릿에서 자식 컴포넌트의 프로퍼티나 메소드에 자유롭게 접근할 수 있다.
이 예제에서는 부모 컴포넌트에 있는 버튼을 각각 자식 컴포넌트의 start 함수와 stop 함수와 연결하며, seconds 프로퍼티를 직접 가져와서 부모 컴포넌트에서 활용한다.
부모 컴포넌트와 자식 컴포넌트가 어떻게 연동되는지 확인해 보자.
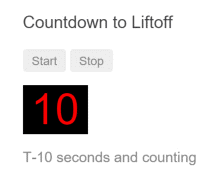
부모 컴포넌트의 템플릿에 표시되는 타이머는 자식 컴포넌트에 있는 프로퍼티를 참조하기 때문에 자식 컴포넌트에서 표시하는 메시지와 같은 값을 표시한다. 그리고 다음 테스트 코드는 Stop 버튼을 클릭했을 때 카운트다운 타이머가 멈추는지도 확인한다:
// ...
// 이 테스트는 `setInterval()` 함수를 사용해서 주기적으로 비동기 요청을 보내기 때문에
// 앱이 안정된 상태(stablized)로 되지 않습니다.
// 자세한 내용은 https://angular.io/api/core/ApplicationRef#is-stable-examples 문서를 참고하세요.
// 그래서 이 테스트를 종료하려면 Angular 앱이 안정된 상태일 때 자동으로 종료되는 기능을 비활성화해야 합니다.
beforeEach(() => browser.waitForAngularEnabled(false));
afterEach(() => browser.waitForAngularEnabled(true));

it("timer and parent seconds should match", async () => {
  const parent = element(by.tagName(parentTag));
  const startButton = parent.element(by.buttonText("Start"));
  const seconds = parent.element(by.className("seconds"));
  const timer = parent.element(by.tagName("app-countdown-timer"));

  await startButton.click();

  // 텍스트가 전달되는 `<app-countdown-timer>`를 기다립니다.
  await browser.wait(() => timer.getText(), 2000);

  expect(await timer.getText()).toContain(await seconds.getText());
});

it("should stop the countdown", async () => {
  const parent = element(by.tagName(parentTag));
  const startButton = parent.element(by.buttonText("Start"));
  const stopButton = parent.element(by.buttonText("Stop"));
  const timer = parent.element(by.tagName("app-countdown-timer"));

  await startButton.click();
  expect(await timer.getText()).not.toContain("Holding");

  await stopButton.click();
  expect(await timer.getText()).toContain("Holding");
});
// ...
6. @ViewChild()로 자식 컴포넌트 접근하기
템플릿 지역 변수로 자식 컴포넌트에 접근하는 것은 문법도 간단하고 이해하기 쉽다. 하지만 이 방식은 부모 컴포넌트의 템플릿에서만 자식 컴포넌트에 접근할 수 있기 때문에 자유롭게 활용하기에는 제한이 있다. 부모 컴포넌트의 클래스에서는 자식 컴포넌트에 접근할 수 없기 때문이다.
템플릿 지역 변수를 사용하는 방식은 부모 컴포넌트의 클래스에서는 사용할 수 없다. 컴포넌트의 부모-자식 관계는 컴포넌트가 완전히 생성된 이후에 구성되기 때문이다. 그래서 부모 컴포넌트의 클래스에서는 자식 컴포넌트의 프로퍼티를 읽거나 메소드를 실행할 수 없다.
부모 컴포넌트의 클래스에서 자식 컴포넌트에 접근하려면 자식 컴포넌트에 ViewChild를 사용해서 부모 컴포넌트로 주입(inject) 해야 한다.
이 내용은 예제를 보면서 알아봅시다. 이 예제는 위에서 살펴본 카운트다운 타이머와 거의 비슷하지만, 구현 방식은 조금 다르다. 먼저, 자식 컴포넌트 CountdownTimerComponent 코드는 동일하다.
Note
- 템플릿 지역 변수를 사용하는 방식과 ViewChild를 사용하는 방식은 거의 비슷하다.
- 사용하려는 목적에 따라 구현 방식을 선택하면 된다.
그리고 부모 컴포넌트인 CountdownViewChildParentComponent는 다음과 같이 구현한다:
import { AfterViewInit, ViewChild } from "@angular/core";
import { Component } from "@angular/core";
import { CountdownTimerComponent } from "./countdown-timer.component";

@Component({
  selector: "app-countdown-parent-vc",
  template: `
    <h3>Countdown to Liftoff (via ViewChild)</h3>
    <button (click)="start()">Start</button>
    <button (click)="stop()">Stop</button>
    <div class="seconds">{{ seconds() }}</div>
    <app-countdown-timer></app-countdown-timer>
  `,
  styleUrls: ["../assets/demo.css"],
})
export class CountdownViewChildParentComponent implements AfterViewInit {
  @ViewChild(CountdownTimerComponent)
  private timerComponent!: CountdownTimerComponent;

  seconds() {
    return 0;
  }

  ngAfterViewInit() {
    // `seconds()` 메소드는 `CountdownTimerComponent.seconds`에서 다시 구현합니다.
    // 이 때 개발 모드에서 출력하는 단방향 바인딩 검사 에러를 방지하기 위해
    // 한 싸이클 기다려야 합니다.
    setTimeout(() => (this.seconds = () => this.timerComponent.seconds), 0);
  }

  start() {
    this.timerComponent.start();
  }
  stop() {
    this.timerComponent.stop();
  }
}
이 코드를 보면 부모 컴포넌트 클래스에서 자식 컴포넌트에 이전보다 좀 더 많이 개입하는 것을 확인할 수 있다.
먼저, ViewChild 데코레이터와 AfterViewInit 라이프싸이클 후킹 인터페이스를 로드한다.
그리고 CountdownTimerComponent를 timerComponent 프로퍼티로 선언하면서 @ViewChild 데코레이터를 사용했다.
이전에 사용했던 부모 컴포넌트의 템플릿은 템플릿 지역 변수 #timer를 활용해서 자식 컴포넌트의 메소드를 직접 실행했다. 하지만 이번 예제는 자식 컴포넌트를 직접 호출하지 않고 부모 컴포넌트에 있는 start, stop 메소드를 사용하며, 현재 남아있는 초를 확인할 때도 부모 컴포넌트의 seconds 메소드를 활용한다.
각각의 메소드에서 자식 컴포넌트에 접근하는 식으로 구현하는 것이다.
이 때 ngAfterViewInit() 라이프싸이클 후킹 함수가 중요하다. 자식 컴포넌트인 타이머 컴포넌트는 Angular가 부모 컴포넌트의 뷰를 화면에 표시한 이후에야 사용할 수 있다. 그래서 뷰가 완전히 준비되기 전까지는 0을 표시한다.
부모 컴포넌트의 뷰가 준비되면 자식 컴포넌트에서 시간을 가져오기 위해 ngAfterViewInit 라이프싸이클 후킹 함수를 실행하는데, Angular는 단방향 데이터 흐름을 권장하기 때문에 부모 컴포넌트의 뷰를 같은 JavaScript 실행 싸이클 안에서 갱신하는 것을 금지한다.
그래서 ngAfterViewInit()에서 자식 컴포넌트의 시간을 가져와서 부모 컴포넌트 프로퍼티에 할당하는 것은 setTimeout() 으로 한 싸이클 늦췄다.
이전에 살펴봤던 카운트다운 타이머 테스트와 같다.
7. 서비스를 사용해서 통신하기
부모 컴포넌트와 자식 컴포넌트가 같은 서비스를 주입받는다면 이 서비스를 활용해서 양방향으로 데이터를 주고받을 수 있다.
컴포넌트에 주입되는 서비스는 그 컴포넌트에서 자유롭게 사용할 수 있다. 이 때 주입되는 서비스의 인스턴스가 동일해야 하기 때문에 서비스 프로바이더를 별도로 지정하면 컴포넌트 통신에 활용할 수 없다.
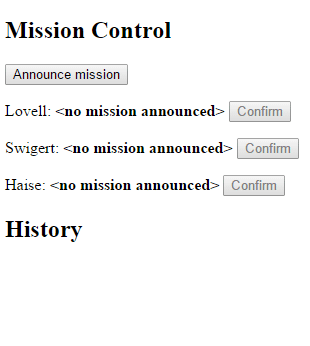
MissionControlComponent가 여러 개의 AstronautComponent와 통신하기 위해 MissionService를 만들어 보자.
import { Injectable } from "@angular/core";
import { Subject } from "rxjs";

@Injectable()
export class MissionService {
  // 문자열 타입의 옵저버블 소스
  private missionAnnouncedSource = new Subject<string>();
  private missionConfirmedSource = new Subject<string>();

  // 문자열 옵저버블 스트림
  missionAnnounced$ = this.missionAnnouncedSource.asObservable();
  missionConfirmed$ = this.missionConfirmedSource.asObservable();

  // 서비스가 옵저버블을 전달할 때 사용하는 메소드
  announceMission(mission: string) {
    this.missionAnnouncedSource.next(mission);
  }

  confirmMission(astronaut: string) {
    this.missionConfirmedSource.next(astronaut);
  }
}
MissionControlComponent는 생성자를 통해 MissionService의 인스턴스를 주입받으며, providers 메타데이터를 사용해서 서비스 인스턴스를 자식 컴포넌트에서도 사용할 수 있도록 공유한다:
import { Component } from "@angular/core";

import { MissionService } from "./mission.service";

@Component({
  selector: "app-mission-control",
  template: `
    <h2>Mission Control</h2>
    <button (click)="announce()">Announce mission</button>

    <app-astronaut *ngFor="let astronaut of astronauts" [astronaut]="astronaut">
    </app-astronaut>

    <h3>History</h3>
    <ul>
      <li *ngFor="let event of history">{{ event }}</li>
    </ul>
  `,
  providers: [MissionService],
})
export class MissionControlComponent {
  astronauts = ["Lovell", "Swigert", "Haise"];
  history: string[] = [];
  missions = ["Fly to the moon!", "Fly to mars!", "Fly to Vegas!"];
  nextMission = 0;

  constructor(private missionService: MissionService) {
    missionService.missionConfirmed$.subscribe((astronaut) => {
      this.history.push(`${astronaut} confirmed the mission`);
    });
  }

  announce() {
    const mission = this.missions[this.nextMission++];
    this.missionService.announceMission(mission);
    this.history.push(`Mission "${mission}" announced`);
    if (this.nextMission >= this.missions.length) {
      this.nextMission = 0;
    }
  }
}
그리고 자식 컴포넌트 AstronautComponent도 생성자를 통해 서비스 인스턴스를 주입 받는다:
import { Component, Input, OnDestroy } from "@angular/core";

import { MissionService } from "./mission.service";
import { Subscription } from "rxjs";

@Component({
  selector: "app-astronaut",
  template: `
    <p>
      {{ astronaut }}: <strong>{{ mission }}</strong>
      <button (click)="confirm()" [disabled]="!announced || confirmed">
        Confirm
      </button>
    </p>
  `,
})
export class AstronautComponent implements OnDestroy {
  @Input() astronaut = "";
  mission = "<no mission announced>";
  confirmed = false;
  announced = false;
  subscription: Subscription;

  constructor(private missionService: MissionService) {
    this.subscription = missionService.missionAnnounced$.subscribe(
      (mission) => {
        this.mission = mission;
        this.announced = true;
        this.confirmed = false;
      }
    );
  }

  confirm() {
    this.confirmed = true;
    this.missionService.confirmMission(this.astronaut);
  }

  ngOnDestroy() {
    // prevent memory leak when component destroyed
    this.subscription.unsubscribe();
  }
}
Note
- 이 예제는 옵저버블을 활용하기 때문에
AstronautComponent가 종료될 때 옵저버블을 해제하기 위해unsubscribe()를 실행한다. - 이 함수는 메모리 누수를 막기 위해 필요하며,
AstronautComponent가 종료되는 시점이 앱이 종료되는 시점과 같다면 이 로직을 작성하지 않아도 문제는 없다. - 하지만 애플리케이션이 복잡해진다면 그렇지 않을 가능성이 더 크기 때문에 빠뜨리지 않고 작성하는 것이 좋다.
- 그리고 이 로직은 부모 컴포넌트
MissionControlComponent에는 필요 없다. - 부모 컴포넌트와
MissionService가 종료되는 시점은 같다.
부모 컴포넌트 MissionControlComponent와 자식 컴포넌트 AstronautComponent가 서비스를 통해 데이터를 주고받는 과정은 History 영역에 다음과 같이 표시된다:
부모 컴포넌트 MissionControlComponent와 자식 컴포넌트 AstronautComponent의 버튼을 클릭했을 때 로그를 제대로 출력하는지 확인하기 위해 테스트 코드를 다음과 같이 작성한다:
// ...
it("should announce a mission", async () => {
  const missionControl = element(by.tagName("app-mission-control"));
  const announceButton = missionControl.all(by.tagName("button")).get(0);
  const history = missionControl.all(by.tagName("li"));

  await announceButton.click();

  expect(await history.count()).toBe(1);
  expect(await history.get(0).getText()).toMatch(/Mission.* announced/);
});

it("should confirm the mission by Lovell", async () => {
  await testConfirmMission(1, "Lovell");
});

it("should confirm the mission by Haise", async () => {
  await testConfirmMission(3, "Haise");
});

it("should confirm the mission by Swigert", async () => {
  await testConfirmMission(2, "Swigert");
});

async function testConfirmMission(buttonIndex: number, astronaut: string) {
  const missionControl = element(by.tagName("app-mission-control"));
  const announceButton = missionControl.all(by.tagName("button")).get(0);
  const confirmButton = missionControl
    .all(by.tagName("button"))
    .get(buttonIndex);
  const history = missionControl.all(by.tagName("li"));

  await announceButton.click();
  await confirmButton.click();

  expect(await history.count()).toBe(2);
  expect(await history.get(1).getText()).toBe(
    `${astronaut} confirmed the mission`
  );
}
// ...